导读: 在 iOS 开发中 CocoaPods 作为库依赖管理工具就是一把利器。
有了 CocoaPods 则无需再通过拖 第三方库 及第三方库所依赖的 framework 静态库到项目中等麻烦的操作,仅仅只需要通过终端(Terminal)输入一些指令即可完成这些操作;而且涉及到第三方库的更新升级也可以通过 CocoaPods 进行手动管理更新。
方便快捷!赶快行动起来吧!!!
一、Homebrew、Rvm、Ruby、CocoaPods 简介
1、官网及相关链接
- Rvm 官网 : https://www.rvm.io/
- Ruby 官网 :https://rubygems.org/
- CocoaPods 官网 :https://cocoapods.org/
Rvm 安装指南:https://rvm.io/rvm/installHomebrew 官网:http://brew.sh/index_zh-cn.htmlruby 镜像 - taobao:https://ruby.taobao.org/ruby 镜像 - china:https://gems.ruby-china.org/
2、Homebrew 介绍
Homebrew是一个软件包管理器,用于在 mac 上安装一些 os x 上没有的 UNiX 工具;类似于 360 软件管理器。
3、Rvm 介绍
Rvm全称Ruby Version Manager,是安装和管理ruby的一种工具。
摘录:
RVM is a command-line tool which allows you to easily install, manage, and work with multiple ruby environments from interpreters to sets of gems.
4、Ruby 介绍
Ruby是一种面向对象的脚本语言,简单易用,功能强大。能跨平台和可移植性好等等。其实就是种脚本语言。Ruby的软件源使用的是亚马逊的云服务,国内网络环境下载时可能会出现各种不稳定和超时,所以自带的需要翻墙,可以将官方 ruby 源替换成国内淘宝 ruby 源(https://ruby.taobao.org/ )或者是由China ruby 源(https://gems.ruby-china.org/ )。据消息了解,2016.06淘宝源暂停维护了,建议使用China ruby 源。
5、CocoaPods 介绍
CocoaPods是 iOS 最常用的第三方类库管理工具,绝大部分有名的开源类库都支持CocoaPods。CocoaPods是用ruby实现的,要想使用它首先需要有ruby的环境。幸运的是 OS X 系统默认已经可以运行ruby了。但是有时候ruby版本过低是无法正常支持CocoaPods的使用,所以需要先安装更新升级rvm和ruby。
二、CocoaPods 安装使用
1、检查安装 rvm 环境( 正常情况可直接略过此步骤 )
- 检查当前
rvm环境( 此处检查是否存在rvm环境 ):
$ rvm -v
`输出结果:( 存在 rvm 环境)`
muxuguixiandeMacBook-Pro:~ jijiucheng$ rvm -v
rvm 1.27.0 (latest) by Wayne E. Seguin <wayneeseguin@gmail.com>, Michal Papis <mpapis@gmail.com> [https://rvm.io/]
`输出结果:(不存在 rvm 环境)`
muxuguixiandeMacBook-Pro:~ jijiucheng$ rvm -v
-bash: rvm: command not found
- 情况一:如果不存在
rvm环境,先安装配置rvm环境;
① 期间可能会问你 `sudo管理员` 密码,以及自动通过 `homebrew` 安装依赖包;
等待一段时间后就可以成功安装好 `rvm`。
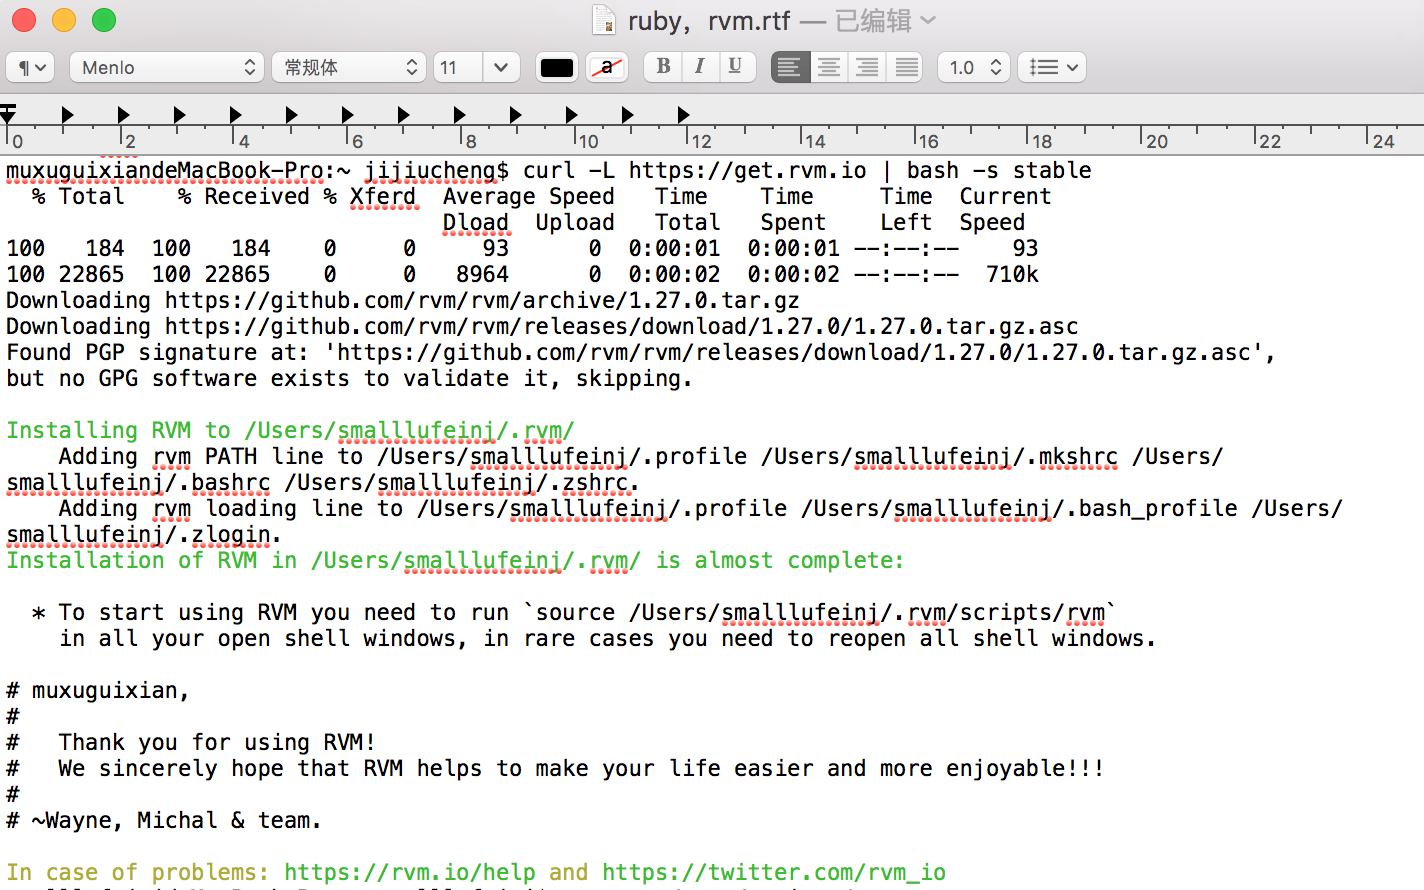
$ curl -L https://get.rvm.io | bash -s stable
输出结果:(下载安装)(显示的 `` 代表一行空格)
muxuguixiandeMacBook-Pro:~ jijiucheng$ curl -L https://get.rvm.io | bash -s stable
  % Total    % Received % Xferd  Average Speed   Time    Time     Time  Current Dload  Upload   Total   Spent    Left  Speed
100   184  100   184    0     0     93      0  0:00:01  0:00:01 --:--:--    93
100 22865  100 22865    0     0   8964      0  0:00:02  0:00:02 --:--:--  710k
Downloading https://github.com/rvm/rvm/archive/1.27.0.tar.gz
Downloading https://github.com/rvm/rvm/releases/download/1.27.0/1.27.0.tar.gz.asc
Found PGP signature at: 'https://github.com/rvm/rvm/releases/download/1.27.0/1.27.0.tar.gz.asc',
but no GPG software exists to validate it, skipping.
``
`Installing RVM to /Users/smalllufeinj/.rvm/`
    Adding rvm PATH line to /Users/smalllufeinj/.profile /Users/smalllufeinj/.mkshrc /Users/smalllufeinj/.bashrc /Users/smalllufeinj/.zshrc.
    Adding rvm loading line to /Users/smalllufeinj/.profile /Users/smalllufeinj/.bash_profile /Users/smalllufeinj/.zlogin.
`Installation of RVM in /Users/smalllufeinj/.rvm/ is almost complete:`
``
  .* To start using RVM you need to run `source /Users/smalllufeinj/.rvm/scripts/rvm`
    in all your open shell windows, in rare cases you need to reopen all shell windows.
``
# muxuguixian,
#
#   Thank you for using RVM!
#   We sincerely hope that RVM helps to make your life easier and more enjoyable!!!
#
# ~Wayne, Michal & team.
``
In case of problems: https://rvm.io/help and https://twitter.com/rvm_io
② 然后,载入 RVM 环境(新开 Termal 就不用这么做了,会自动重新载入的)。
$ source ~/.rvm/scripts/rvm
输出结果:(^_^)(什么都没有输出)
muxuguixiandeMacBook-Pro:~ jijiucheng$ source ~/.rvm/scripts/rvm
③ 再次检查 rvm 是否安装正确。
$ rvm -v
`输出结果:( 存在 rvm 环境)`
muxuguixiandeMacBook-Pro:~ jijiucheng$ rvm -v
rvm 1.27.0 (latest) by Wayne E. Seguin <wayneeseguin@gmail.com>, Michal Papis <mpapis@gmail.com> [https://rvm.io/]
- 情况二:如果存在
rvm环境,用rvm安装ruby环境;- 当
ruby版本低于2.2.2时,安装CocoaPods会报错;为防止ruby版本过低,建议先升级ruby环境,建议升级到2.3.0版本以上。【可以通过$ ruby -v指令检查当前 ruby 版本】
- 当
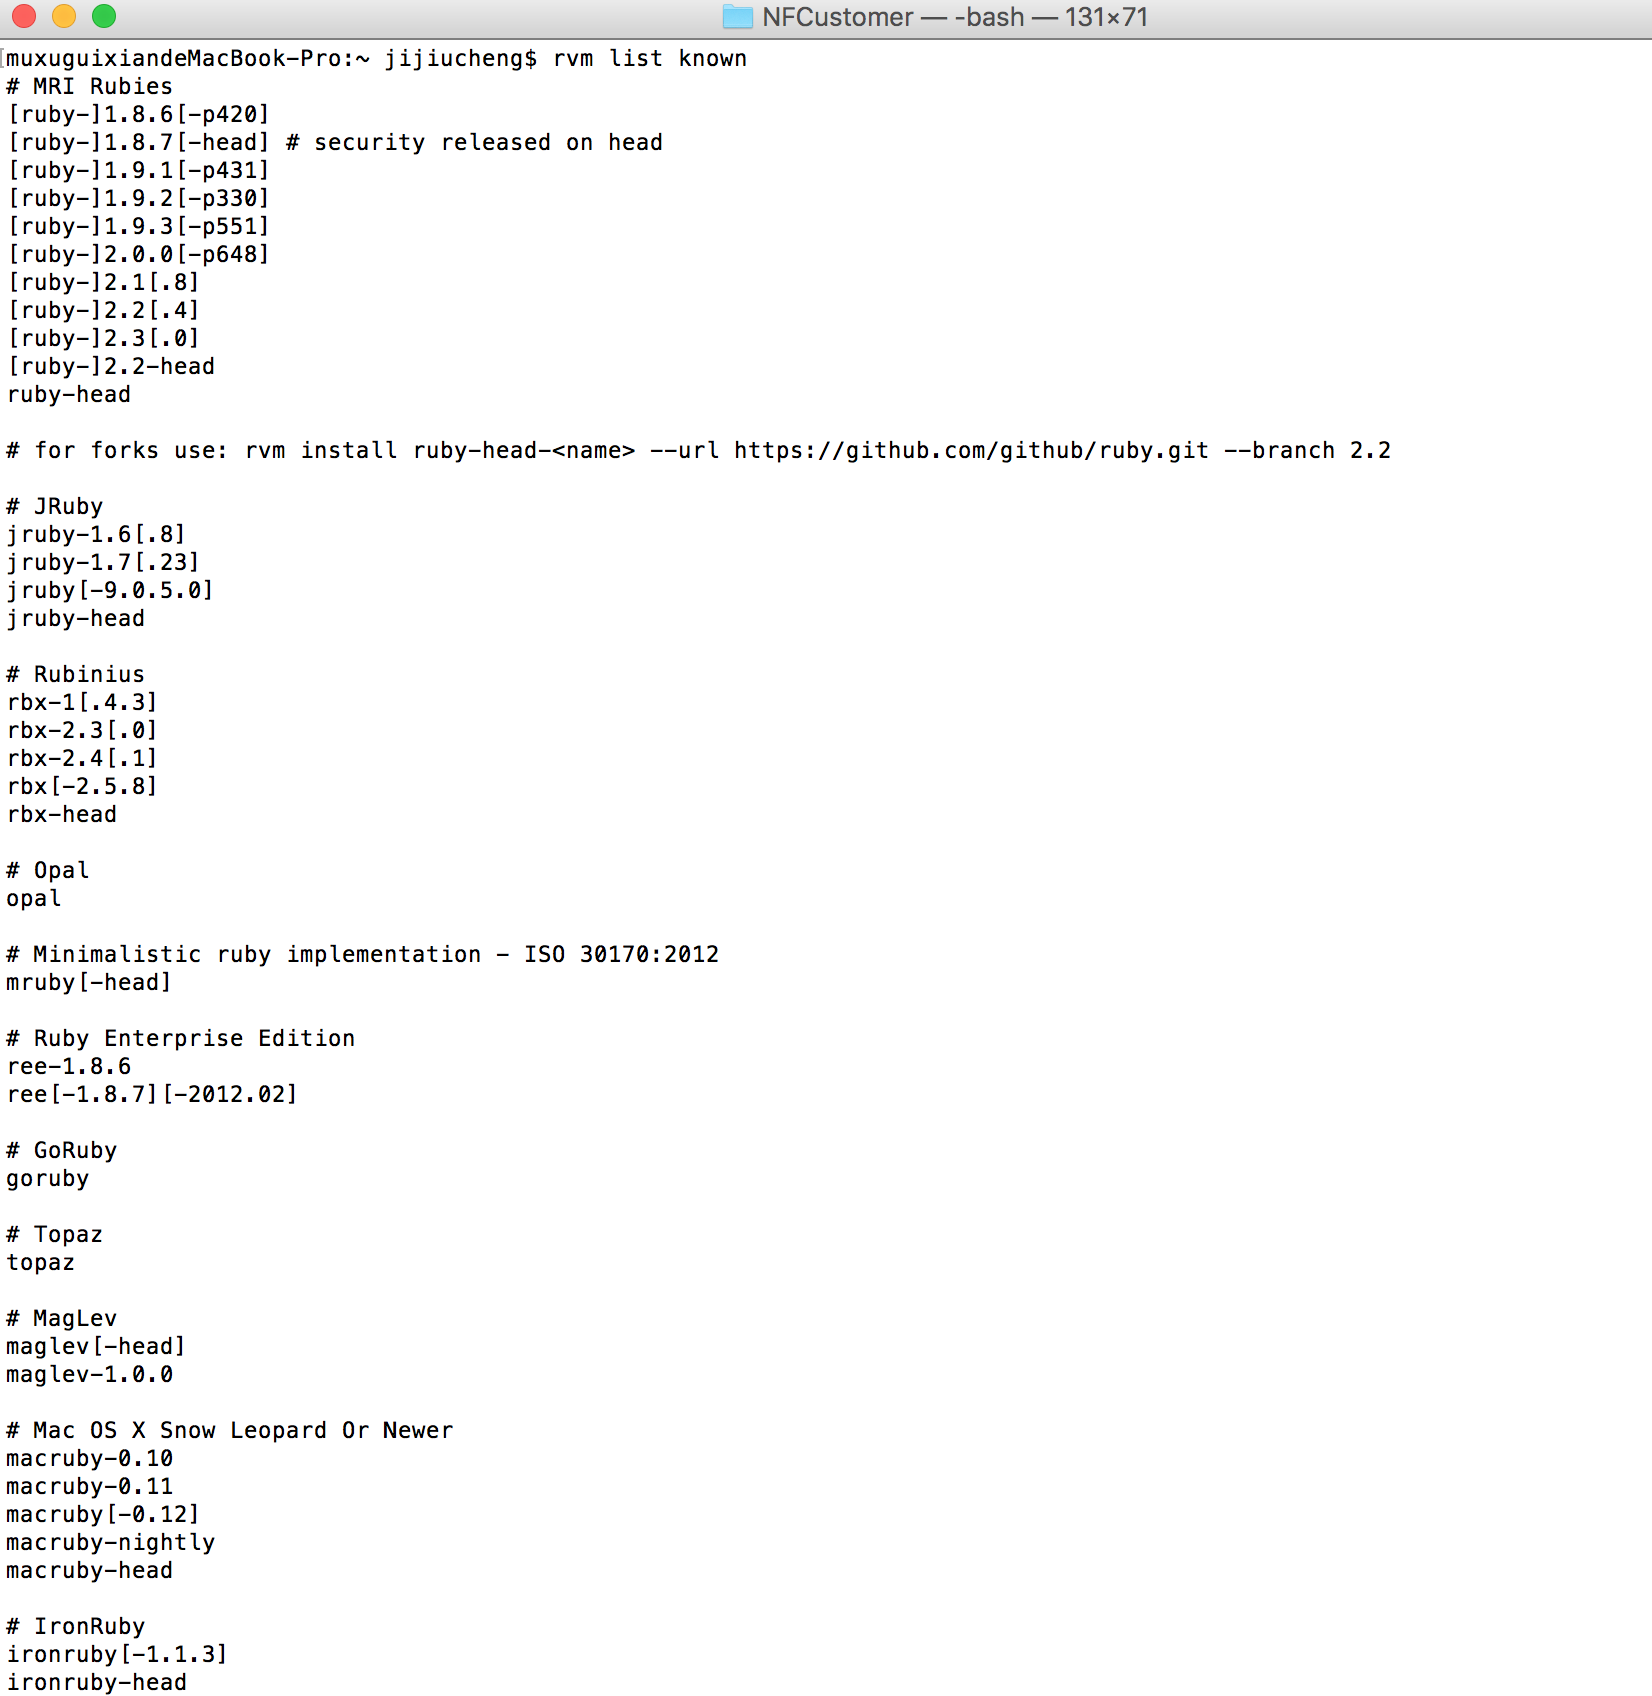
① 查询已知的 ruby 环境。
$ rvm list known
输出结果:(显示的 `` 代表一行空格)
muxuguixiandeMacBook-Pro:~ jijiucheng$ rvm list known
# MRI Rubies
[ruby-]1.8.6[-p420]
[ruby-]1.8.7[-head] # security released on head
[ruby-]1.9.1[-p431]
[ruby-]1.9.2[-p330]
[ruby-]1.9.3[-p551]
[ruby-]2.0.0[-p648]
[ruby-]2.1[.8]
[ruby-]2.2[.4]
[ruby-]2.3[.0]
[ruby-]2.2-head
ruby-head
``
# for forks use: rvm install ruby-head-<name> --url https://github.com/github/ruby.git --branch 2.2
``
# JRuby
jruby-1.6[.8]
jruby-1.7[.23]
jruby[-9.0.5.0]
jruby-head
``
# Rubinius
rbx-1[.4.3]
rbx-2.3[.0]
rbx-2.4[.1]
rbx[-2.5.8]
rbx-head
``
# Opal
opal
``
# Minimalistic ruby implementation - ISO 30170:2012
mruby[-head]
``
# Ruby Enterprise Edition
ree-1.8.6
ree[-1.8.7][-2012.02]
``
# GoRuby
goruby
``
# Topaz
topaz
``
# MagLev
maglev[-head]
maglev-1.0.0
``
# Mac OS X Snow Leopard Or Newer
macruby-0.10
macruby-0.11
macruby[-0.12]
macruby-nightly
macruby-head
``
# IronRuby
ironruby[-1.1.3]
ironruby-head
② 指定 ruby 版本进行更新( 此处按照 ruby 2.3.0 版本进行更新 )。
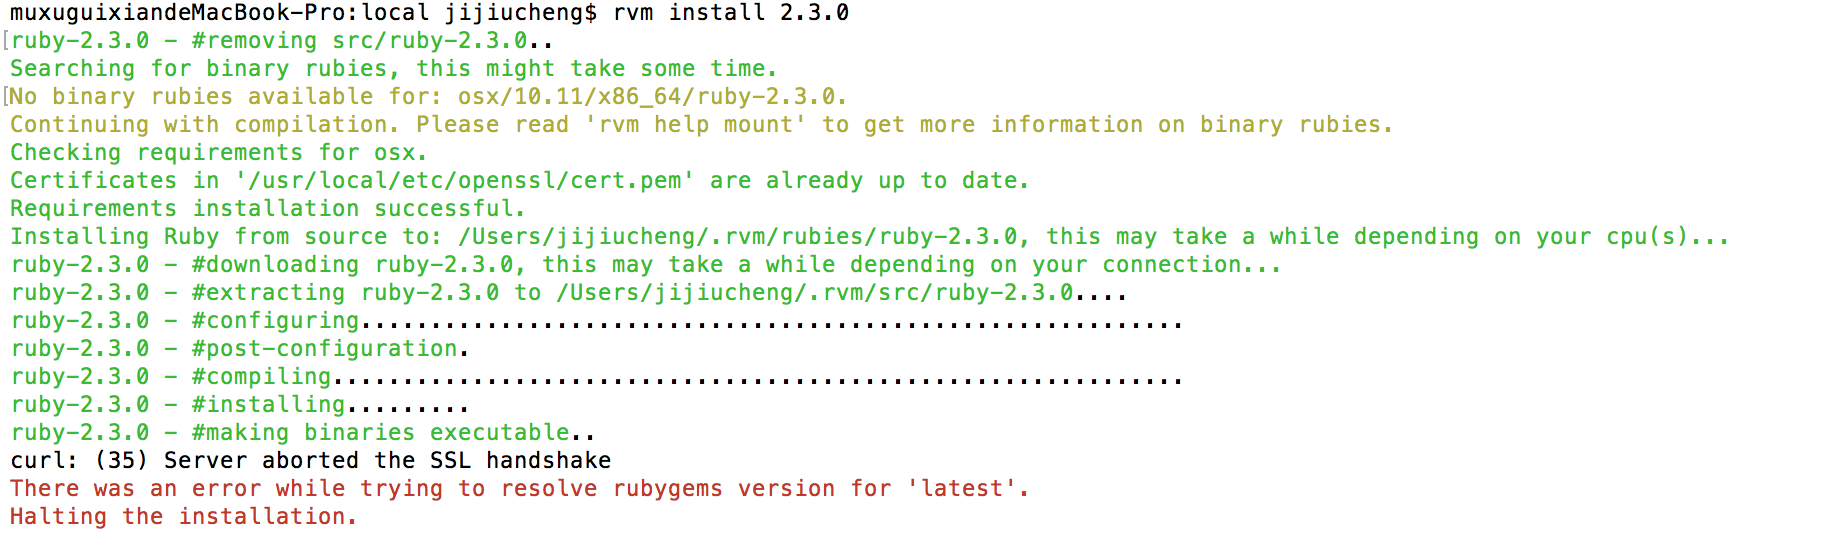
$ rvm install 2.3.0
输出结果:( 此处因为终端输出的字符过多,所以此处用截图方式 )
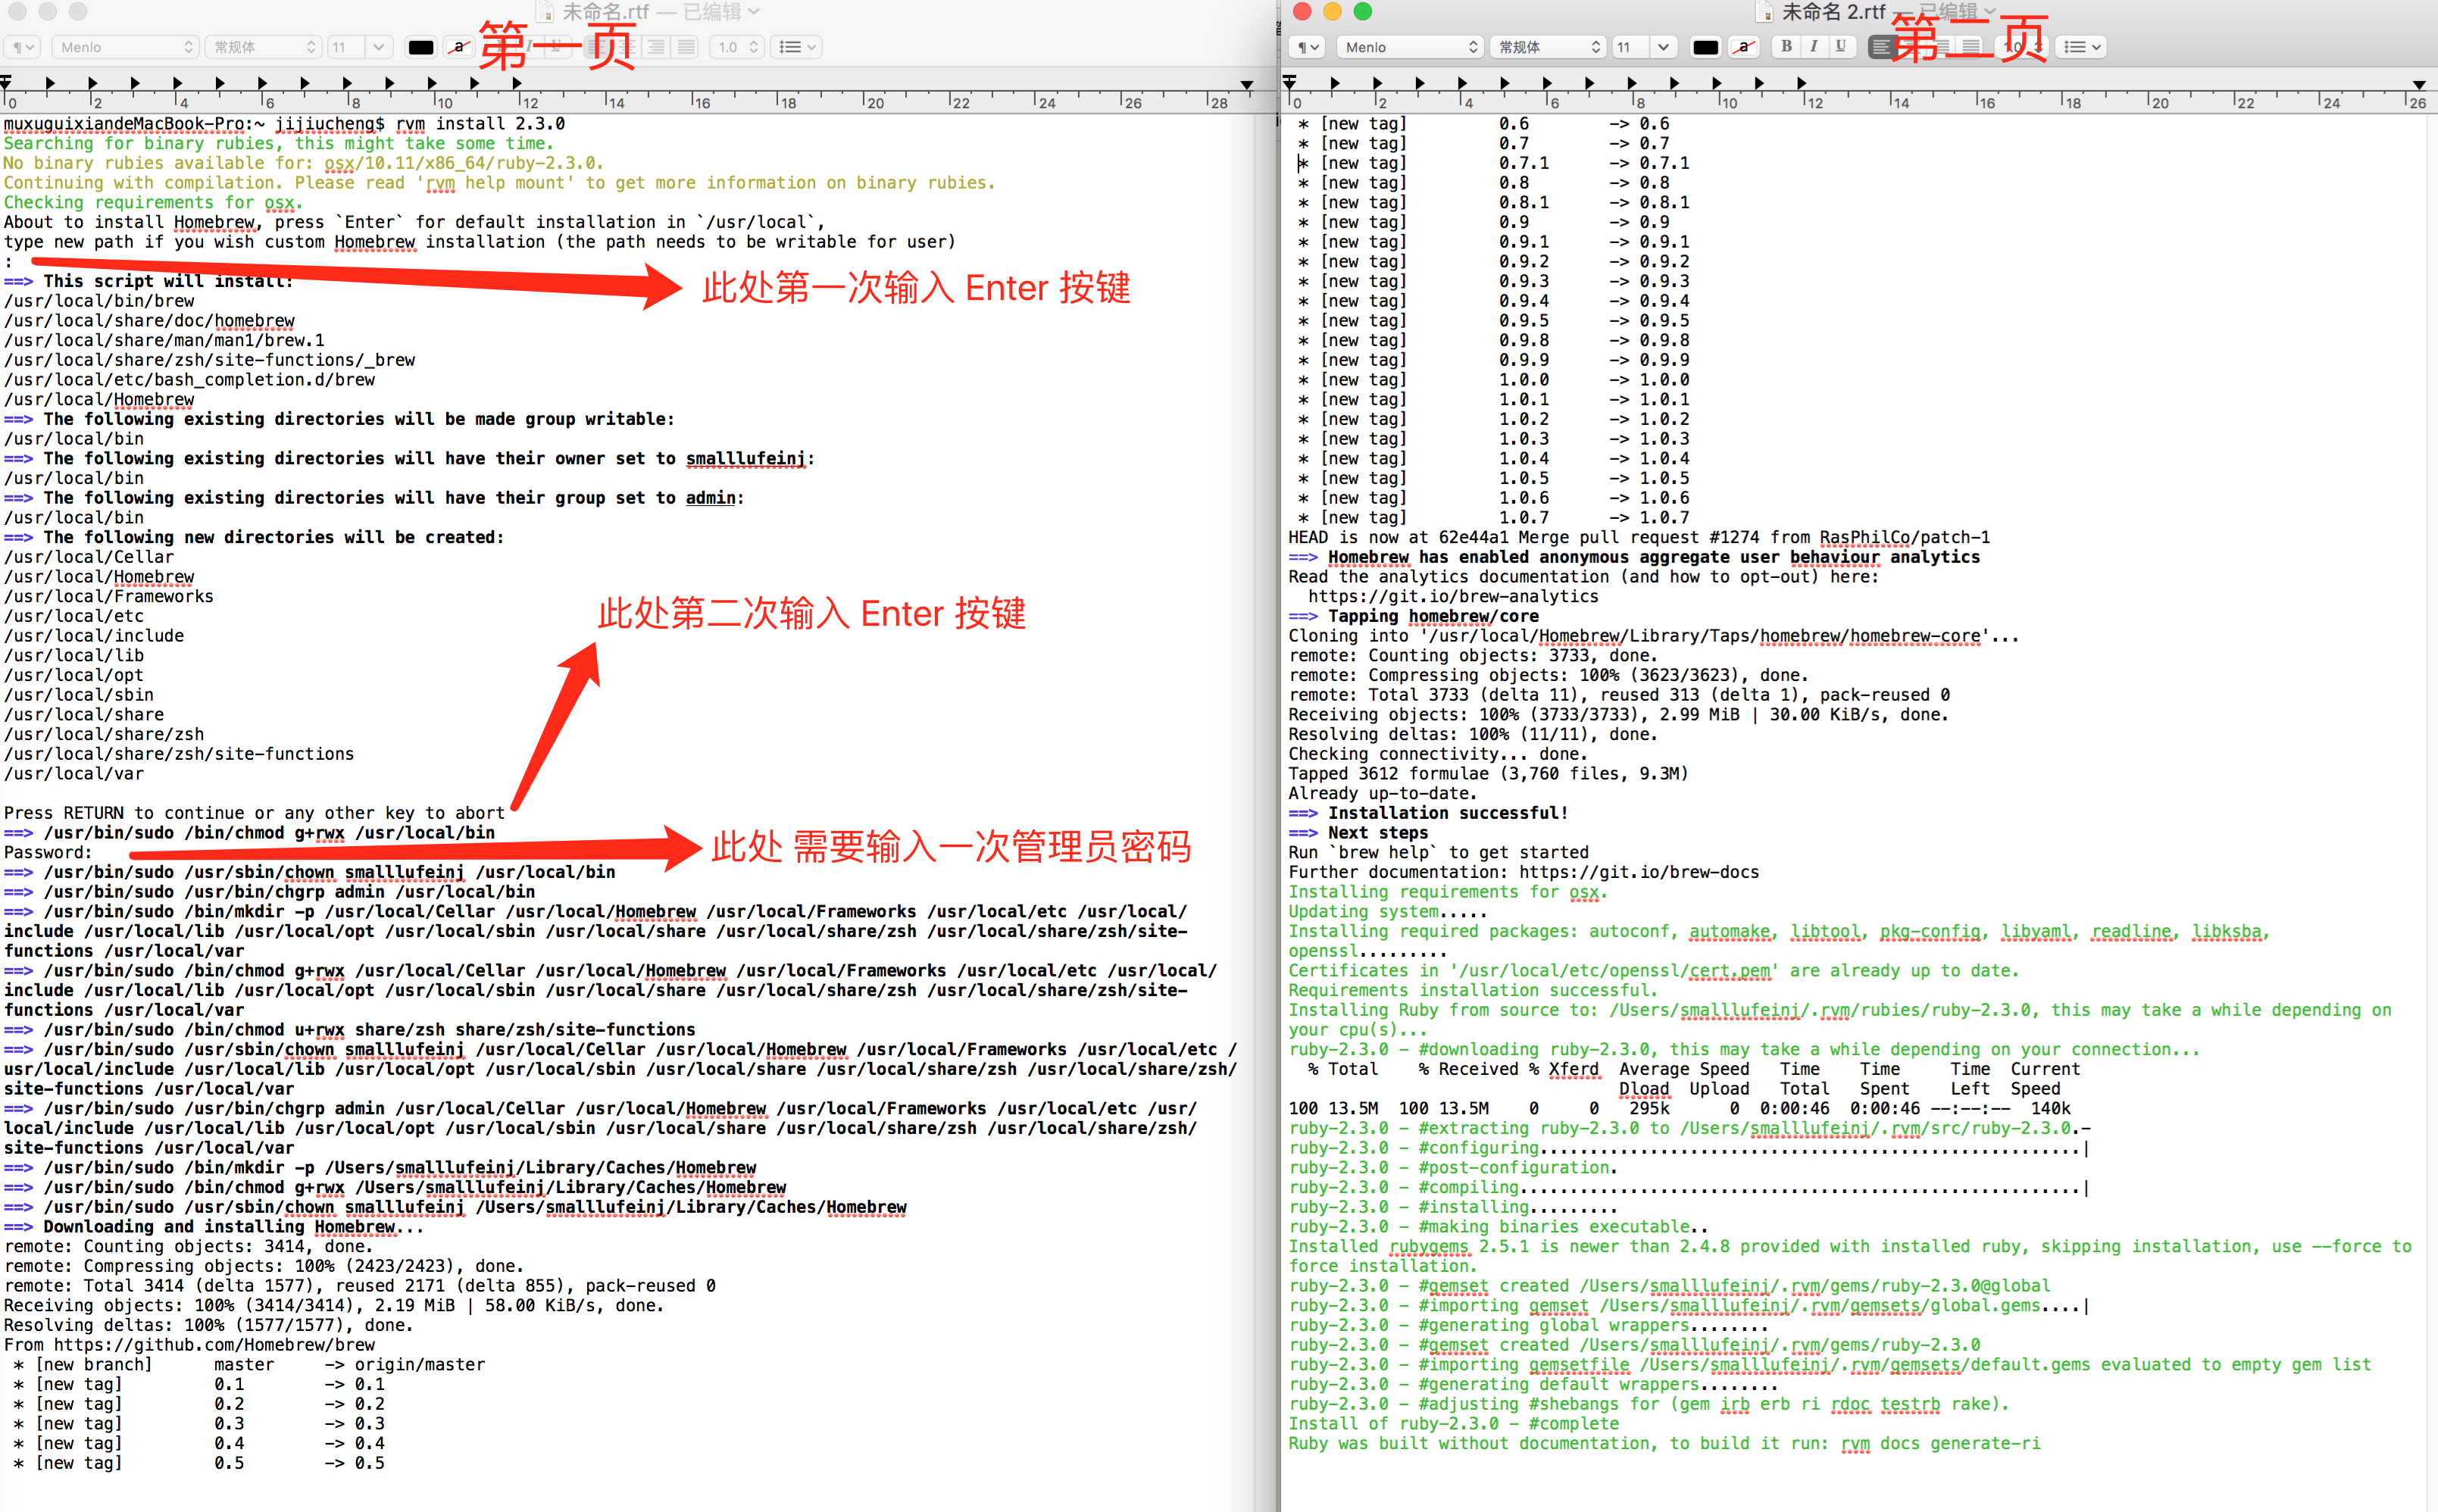
③ 第二步需要一段时间等待,完成后此时 rvm 环境就配置好了;Ruby Gems 就安装好了。
④ 补充相关指令:
查询已安装的 ruby:
$ rvm list
卸载一个已安装版本:
$ rvm remove 1.9.2
2、检查更新 ruby 版本环境(正常情况下从此步骤开始)
CocoaPods是用gem ruby实现的,要想使用它首先需要有gem ruby的环境。且 MAC 的 OS X 系统默认已经可以运行ruby。- 此处建议
gem ruby包环境升级到2.6.x以上。 - 检查
gem ruby版本号:
$ sudo gem -v
检查结果:( 默认情况下版本应该较低,建议升级到 )
muxuguixiandeMacBook-Pro:local jijiucheng$ gem -v
2.5.1
- 更新
gem ruby版本号:
$ sudo gem update --system
更新成功:( 实际打印可能与此不同,但是成功了就会显示 Successfully )
muxuguixiandeMacBook-Pro:local jijiucheng$ gem update --system
Updating rubygems-update
Fetching: rubygems-update-2.6.7.gem (100%)
Successfully installed rubygems-update-2.6.7
此种提示:( 表示已经是最新的 gem ruby 环境 )
muxuguixiandeMacBook-Pro:~ jijiucheng$ gem update --system
Latest version currently installed. Aborting.
- 检查
ruby 源
$ gem sources -l
检查结果:( 如果电脑没安装过 CocoaPods,此时应该是默认 ruby 源 )
muxuguixiandeMacBook-Pro:~ jijiucheng$ gem sources -l
*** CURRENT SOURCES ***
https://rubygems.org/
- 移除
ruby 源
$ gem sources --remove https://rubygems.org/
移除结果:
muxuguixiandeMacBook-Pro:local jijiucheng$ gem sources --remove https://rubygems.org/
https://rubygems.org/ removed from sources
- 替换添加国内镜像源
ruby-china 源,因为上面已经提到国内镜像源taobao 源已经停止维护了,所以此处替换的是ruby-china 源,且尽量确保只有一个ruby-china 源, 备注:https://gems.ruby-china.org已废弃,改为https://gems.ruby-china.com
$ gem sources --add https://gems.ruby-china.com
替换结果:
muxuguixiandeMacBook-Pro:local jijiucheng$ gem sources --add https://gems.ruby-china.com
https://gems.ruby-china.com added to sources
再次检查此时的 ruby 源:( 已经变成了 ruby-china 源 )
muxuguixiandeMacBook-Pro:local jijiucheng$ gem sources -l
*** CURRENT SOURCES ***
https://gems.ruby-china.com
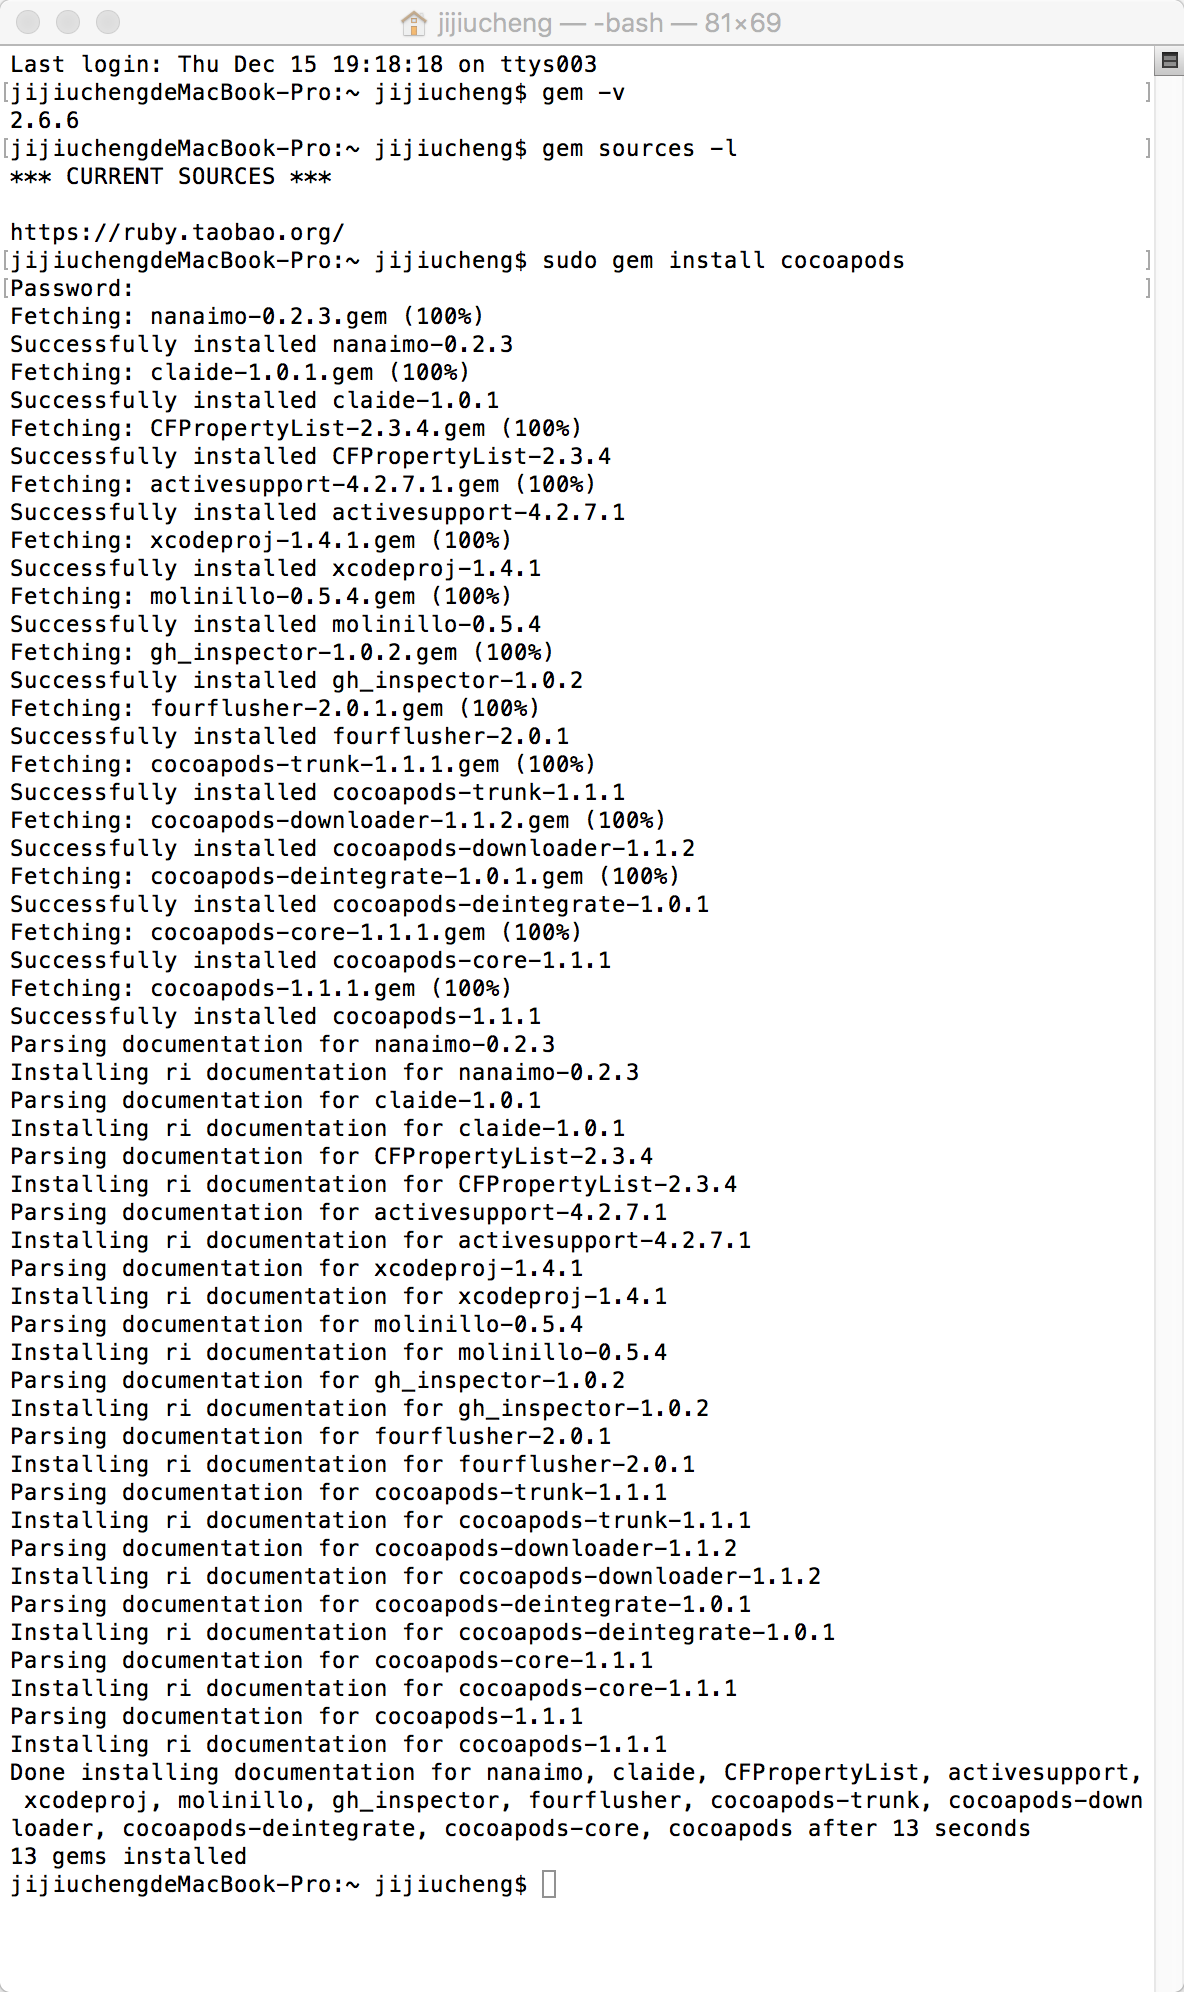
3、安装 CocoaPods
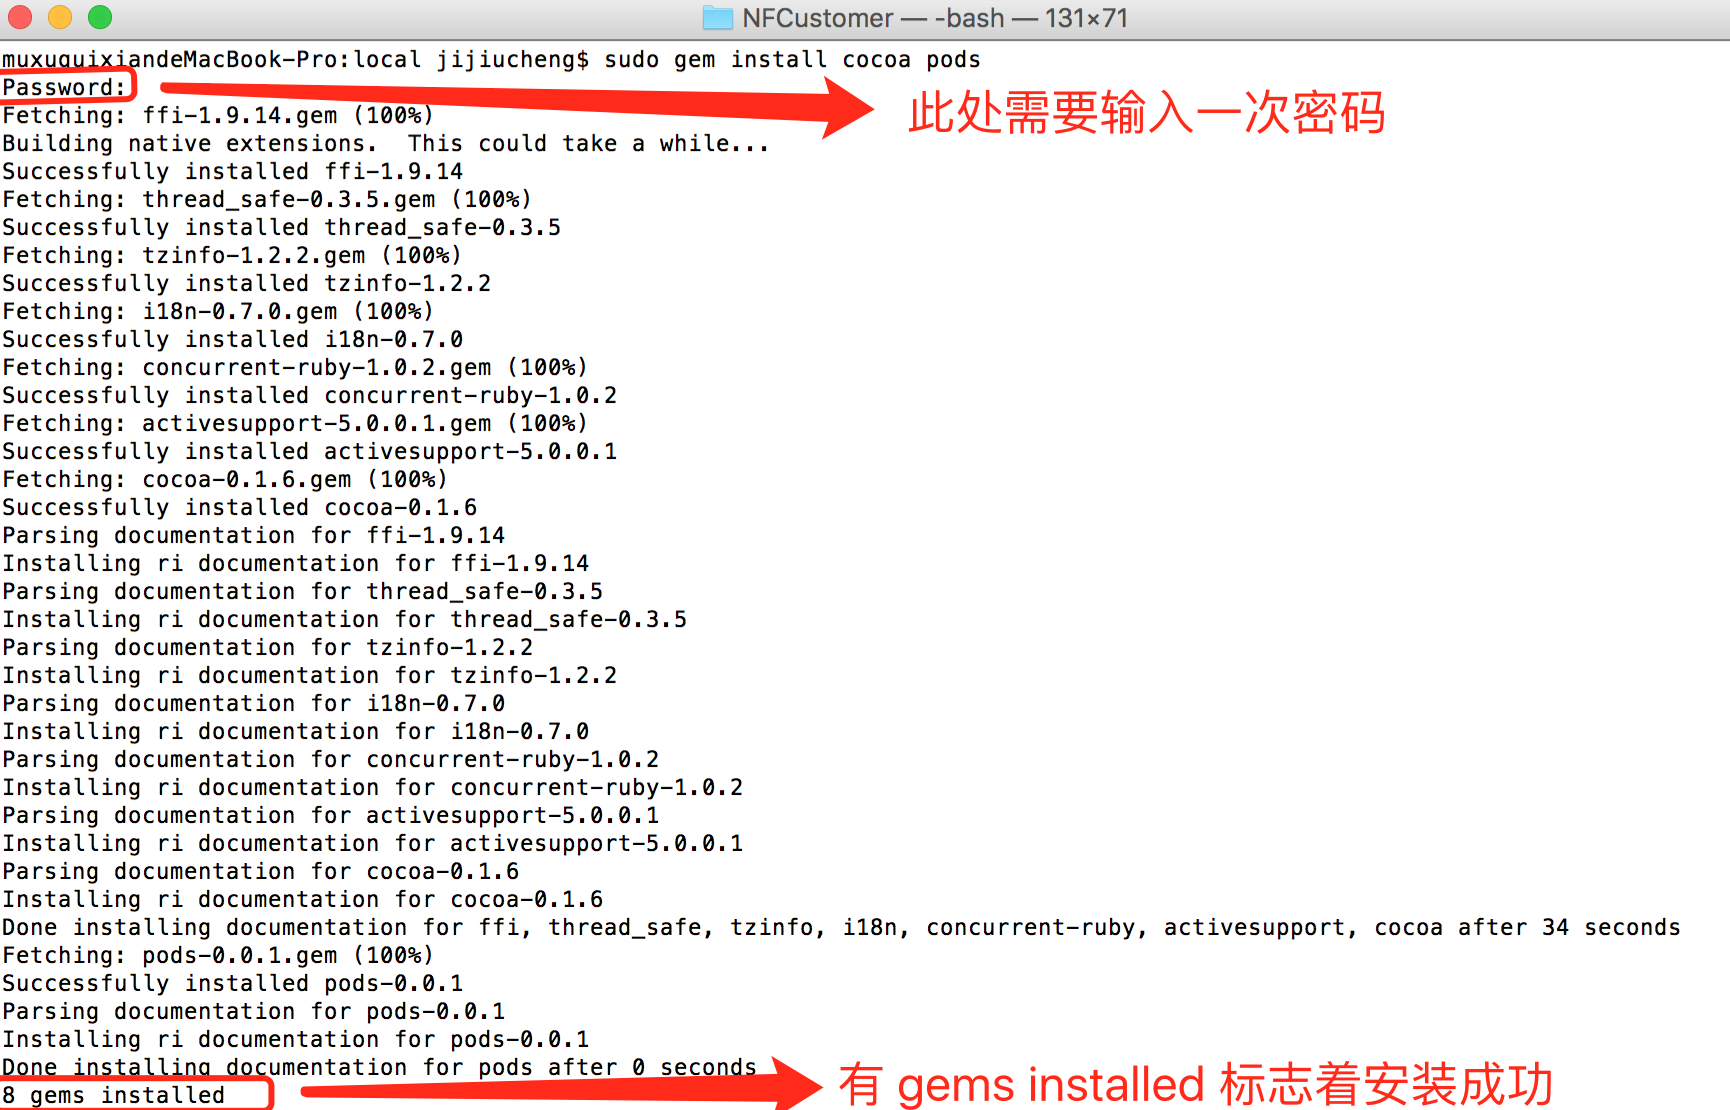
- 安装 CocoaPods(
sudo 表示管理员执行指令)(此处需要输入一次密码)
$ sudo gem install cocoapods
`注意点:<------------------------------> 此处有个注意点`
由于 OS X 系统的不同,此处的指令也是有些变化:
OS X 10.11之前系统的安装 CocoaPods 指令: $ sudo gem install cocoapods
OS X 10.11以后系统的安装 CocoaPods 指令: $ sudo gem install -n /usr/local/bin cocoapods
安装结果:(正常情况打印没有这么多,此处是因为解决报错时,同时打印了这么多)
muxuguixiandeMacBook-Pro:local jijiucheng$ sudo gem install cocoa pods
Password:   <----------------------------------->  // 此处需要输入一次密码
Fetching: ffi-1.9.14.gem (100%)
Building native extensions.  This could take a while...
Successfully installed ffi-1.9.14
Fetching: thread_safe-0.3.5.gem (100%)
Successfully installed thread_safe-0.3.5
Fetching: tzinfo-1.2.2.gem (100%)
Successfully installed tzinfo-1.2.2
Fetching: i18n-0.7.0.gem (100%)
Successfully installed i18n-0.7.0
Fetching: concurrent-ruby-1.0.2.gem (100%)
Successfully installed concurrent-ruby-1.0.2
Fetching: activesupport-5.0.0.1.gem (100%)
Successfully installed activesupport-5.0.0.1
Fetching: cocoa-0.1.6.gem (100%)
Successfully installed cocoa-0.1.6
Parsing documentation for ffi-1.9.14
Installing ri documentation for ffi-1.9.14
Parsing documentation for thread_safe-0.3.5
Installing ri documentation for thread_safe-0.3.5
Parsing documentation for tzinfo-1.2.2
Installing ri documentation for tzinfo-1.2.2
Parsing documentation for i18n-0.7.0
Installing ri documentation for i18n-0.7.0
Parsing documentation for concurrent-ruby-1.0.2
Installing ri documentation for concurrent-ruby-1.0.2
Parsing documentation for activesupport-5.0.0.1
Installing ri documentation for activesupport-5.0.0.1
Parsing documentation for cocoa-0.1.6
Installing ri documentation for cocoa-0.1.6
Done installing documentation for ffi, thread_safe, tzinfo, i18n, concurrent-ruby, activesupport, cocoa after 34 seconds
Fetching: pods-0.0.1.gem (100%)
Successfully installed pods-0.0.1
Parsing documentation for pods-0.0.1
Installing ri documentation for pods-0.0.1
Done installing documentation for pods after 0 seconds
8 gems installed
<------------------ 此处有 gems installed 标志着安装 CocoaPods 成功 ------------------>
- 正常情况下此处会出现很大的坑,经常会出现各种报错问题,大多数是为
ruby环境过低没有更新升级,或者是牵扯到rvm管理器环境的问题,在后面各种报错问题的解决方案的中会有提到。
4、配置 CocoaPods 环境
说明 :此处为了做测试,在 MAC 桌面
Desktop创建了一个工程CocoaPodsTestDemo。第一步 :
cd到目录文件夹,回车enter(快速方式:直接将文件夹拖入到终端Terminal)。
$ cd /Users/jijiucheng/Desktop/CocoaPodsTestDemo
输入结果:((^_^)此时没有任何结果 )
muxuguixiandeMacBook-Pro:~ jijiucheng$ cd /Users/jijiucheng/Desktop/CocoaPodsTestDemo
- 第二步(建议):如果不知道第三方库版本的情况下,建议先查找一下当前所需第三方库的最新版本,可以通过输入指令的方式完成。并且查询完成后输入
wq返回之前终端Terminal页面。
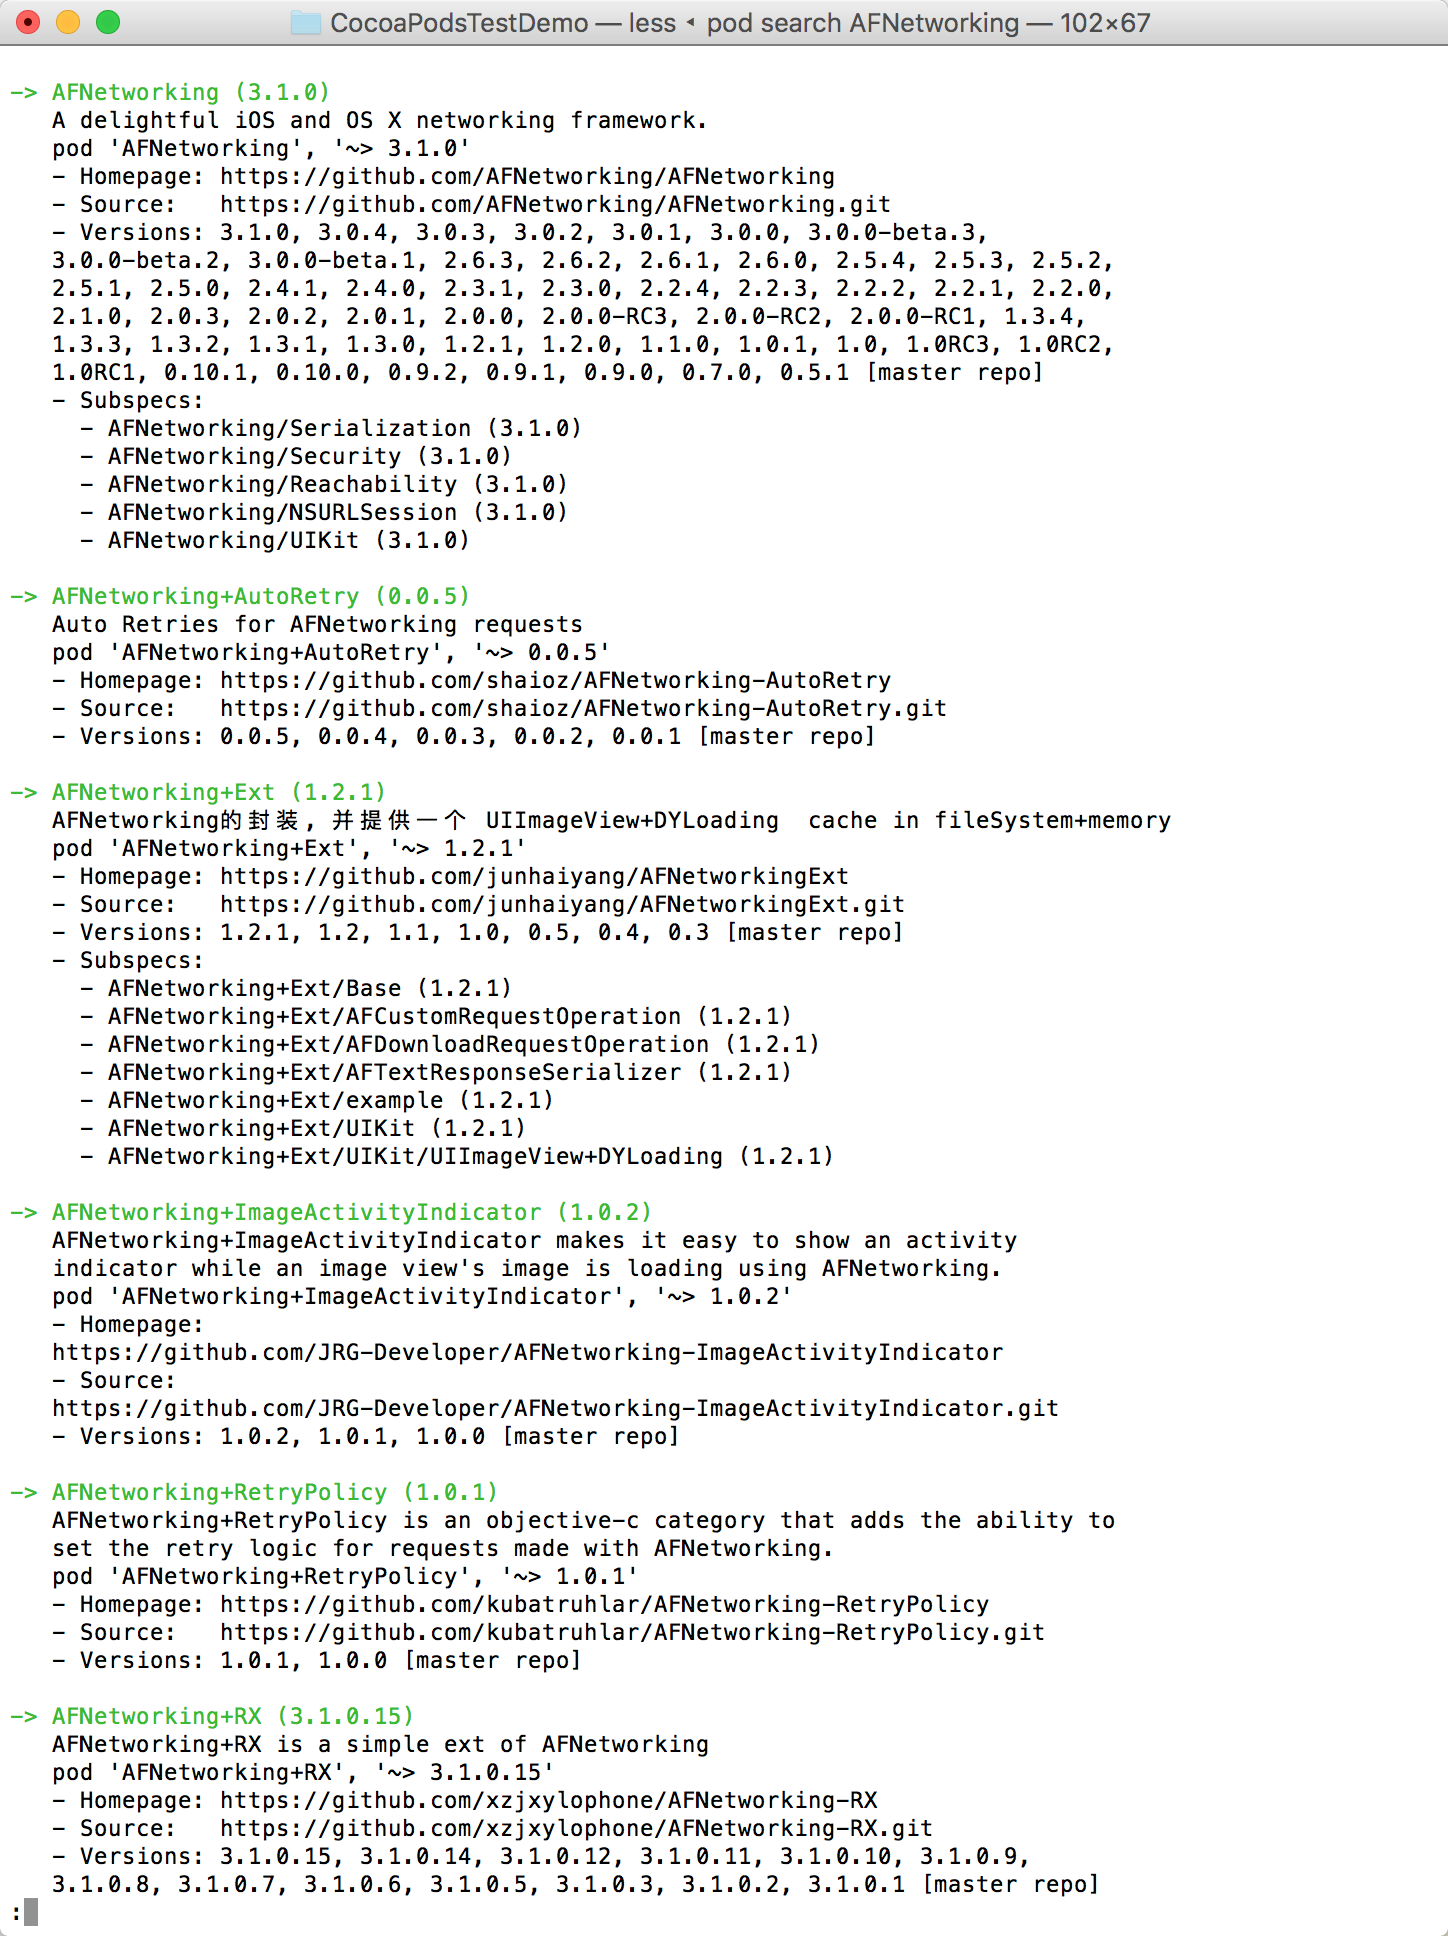
$ pod search 'AFNetworking'
查询结果:(因为会查询输出所有与 'AFNetworking' 相关的第三方库,此处只输出部分,其中下面的“横线”代替实际打印的一行空格)
muxuguixiandeMacBook-Pro:~ jijiucheng$ cd /Users/jijiucheng/Desktop/CocoaPodsTestDemo
muxuguixiandeMacBook-Pro:CocoaPodsTestDemo jijiucheng$ pod search 'AFNetworking'
--------------------------(此处是输出结果)--------------------------
-> AFNetworking (3.1.0)
   A delightful iOS and OS X networking framework.
   pod 'AFNetworking', '~> 3.1.0'
   - Homepage: https://github.com/AFNetworking/AFNetworking
   - Source:   https://github.com/AFNetworking/AFNetworking.git
   - Versions: 3.1.0, 3.0.4, 3.0.3, 3.0.2, 3.0.1, 3.0.0, 3.0.0-beta.3,
   3.0.0-beta.2, 3.0.0-beta.1, 2.6.3, 2.6.2, 2.6.1, 2.6.0, 2.5.4, 2.5.3, 2.5.2,
   2.5.1, 2.5.0, 2.4.1, 2.4.0, 2.3.1, 2.3.0, 2.2.4, 2.2.3, 2.2.2, 2.2.1, 2.2.0,
   2.1.0, 2.0.3, 2.0.2, 2.0.1, 2.0.0, 2.0.0-RC3, 2.0.0-RC2, 2.0.0-RC1, 1.3.4,
   1.3.3, 1.3.2, 1.3.1, 1.3.0, 1.2.1, 1.2.0, 1.1.0, 1.0.1, 1.0, 1.0RC3, 1.0RC2,
   1.0RC1, 0.10.1, 0.10.0, 0.9.2, 0.9.1, 0.9.0, 0.7.0, 0.5.1 [master repo]
   - Subspecs:
     - AFNetworking/Serialization (3.1.0)
     - AFNetworking/Security (3.1.0)
     - AFNetworking/Reachability (3.1.0)
     - AFNetworking/NSURLSession (3.1.0)
     - AFNetworking/UIKit (3.1.0)
......(后面还有好多与 'AFNetworking' 相关的第三方库,此处不一一列举)
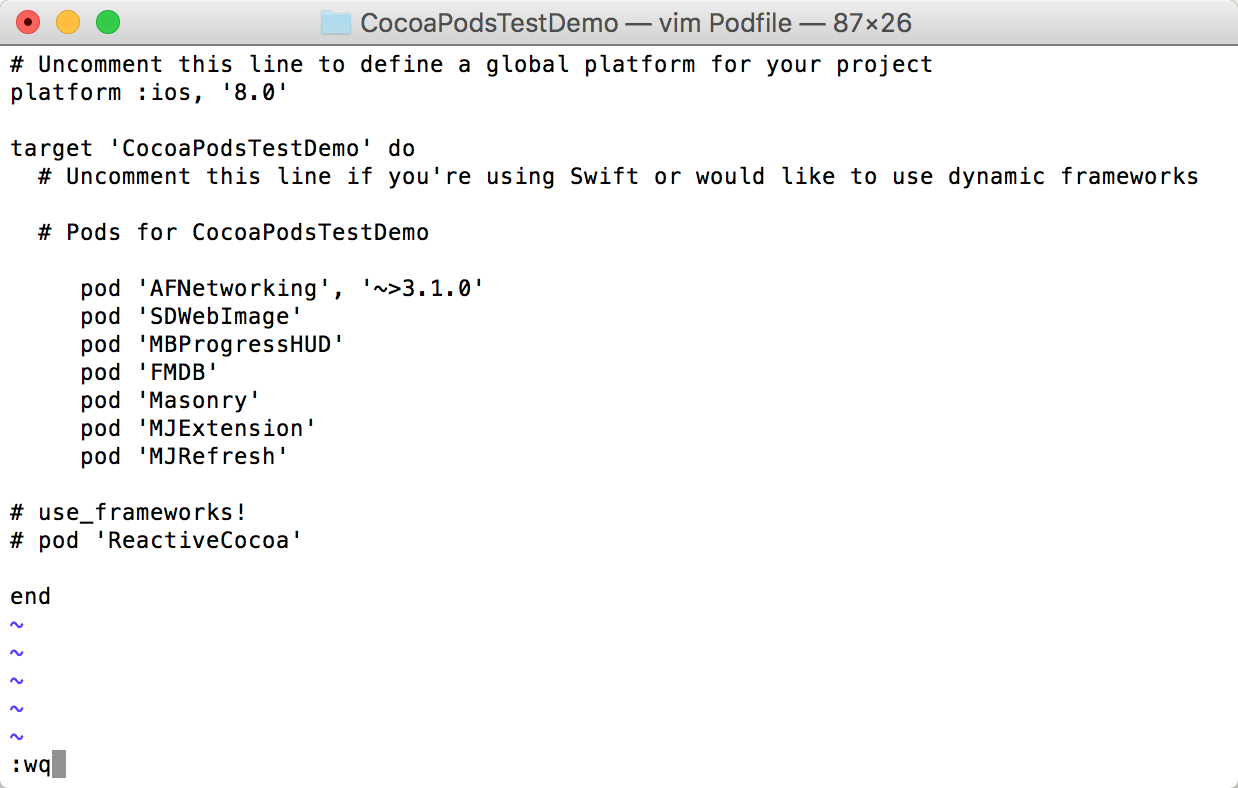
- 第三步:创建 Podfile 配置文件
$ vim Podfile
回车跳转界面(如下):
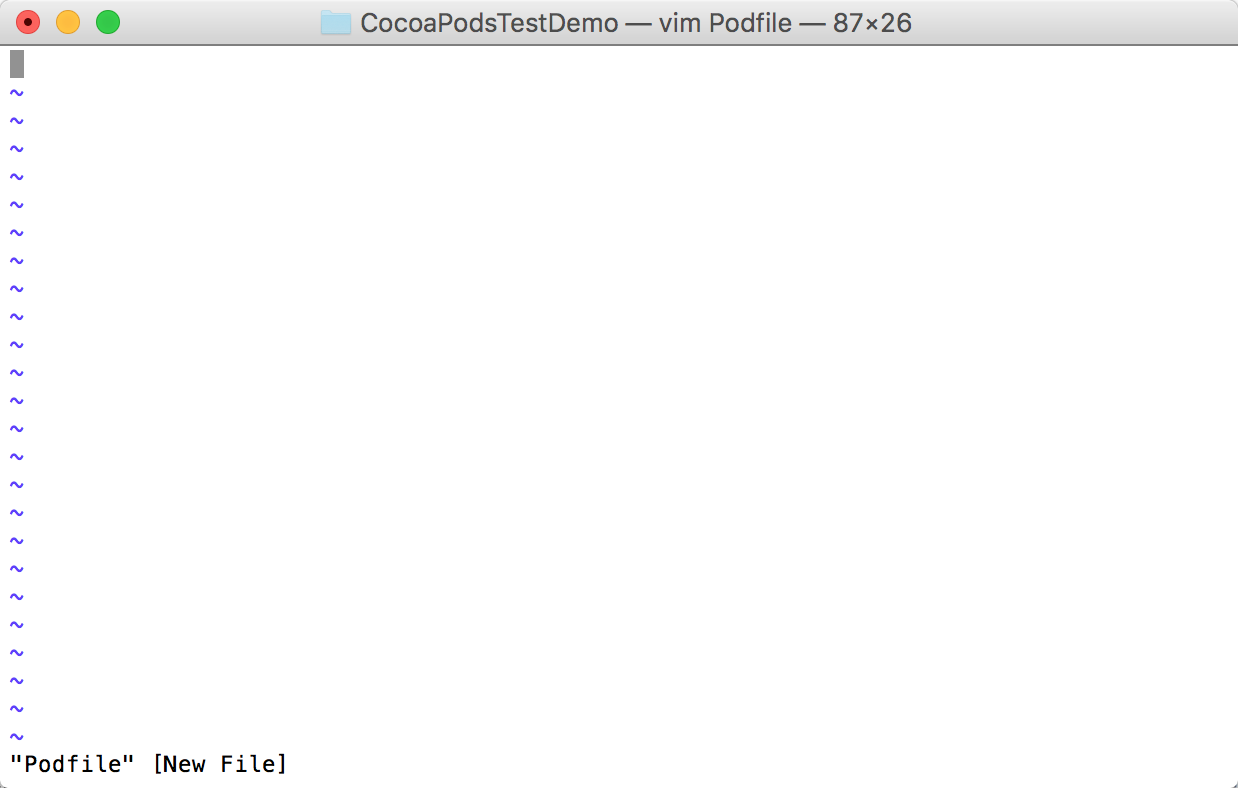
① 键盘输入 i ,进入 Podfile 配置文件的编辑模式,底部会变成 :
-- INSERT --
Podfile 配置文件编辑模式(如下):
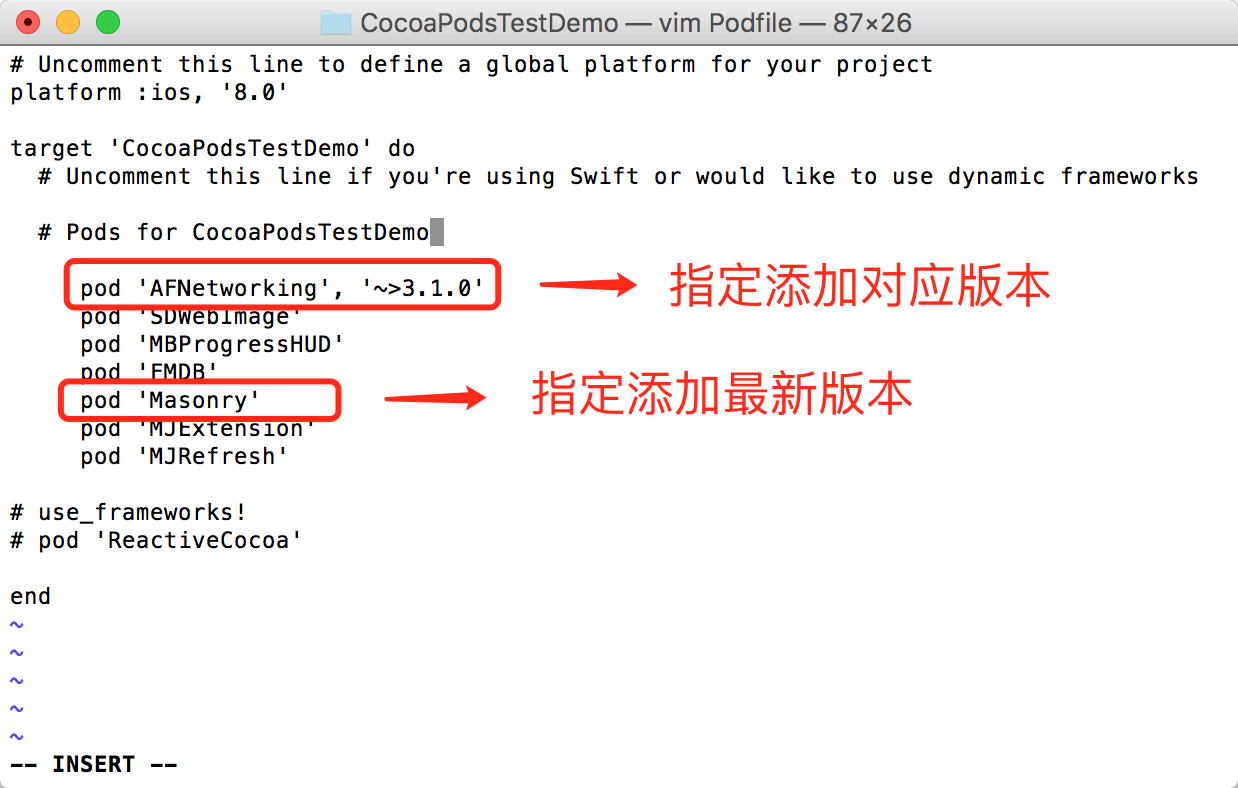
② 通过固定语句编辑进行 Podfile 文件的配置:
Podfile 配置文件固定语句(如下):
 ```说明:可能有些人看到的固定语句不一样,但是大同小异,基本上都能实现最终效果。`
--->
# Uncomment this line to define a global platform for your project
platform :ios, '8.0'
target 'CocoaPodsTestDemo' do
  # Uncomment this line if you're using Swift or would like to use dynamic frameworks
  # Pods for CocoaPodsTestDemo
     pod 'AFNetworking', '~>3.1.0'
     pod 'SDWebImage'
     pod 'MBProgressHUD'
     pod 'FMDB'
     pod 'Masonry'
     pod 'MJExtension'
     pod 'MJRefresh'
# use_frameworks!
# pod 'ReactiveCocoa'
end
③ 当固定语句输入完毕之后,按一次 `Esc` 按键退出编辑模式,底部就没有 `-- INSERT --` 标识了;
再按一次 `shift + :` ( 英文输入法状态下 )组合,底部就会出现一个 `冒号 :` ;
最后再输入 `wq` 回车,返回到配置 Podfile 文件之前的界面;
此时 Podfile 文件就配置好了;
此时可以在 `CocoaPodsTestDemo` 文件夹下发现多了一个 `Podfile` 文件。
Podfile 输入完毕之后(如下):

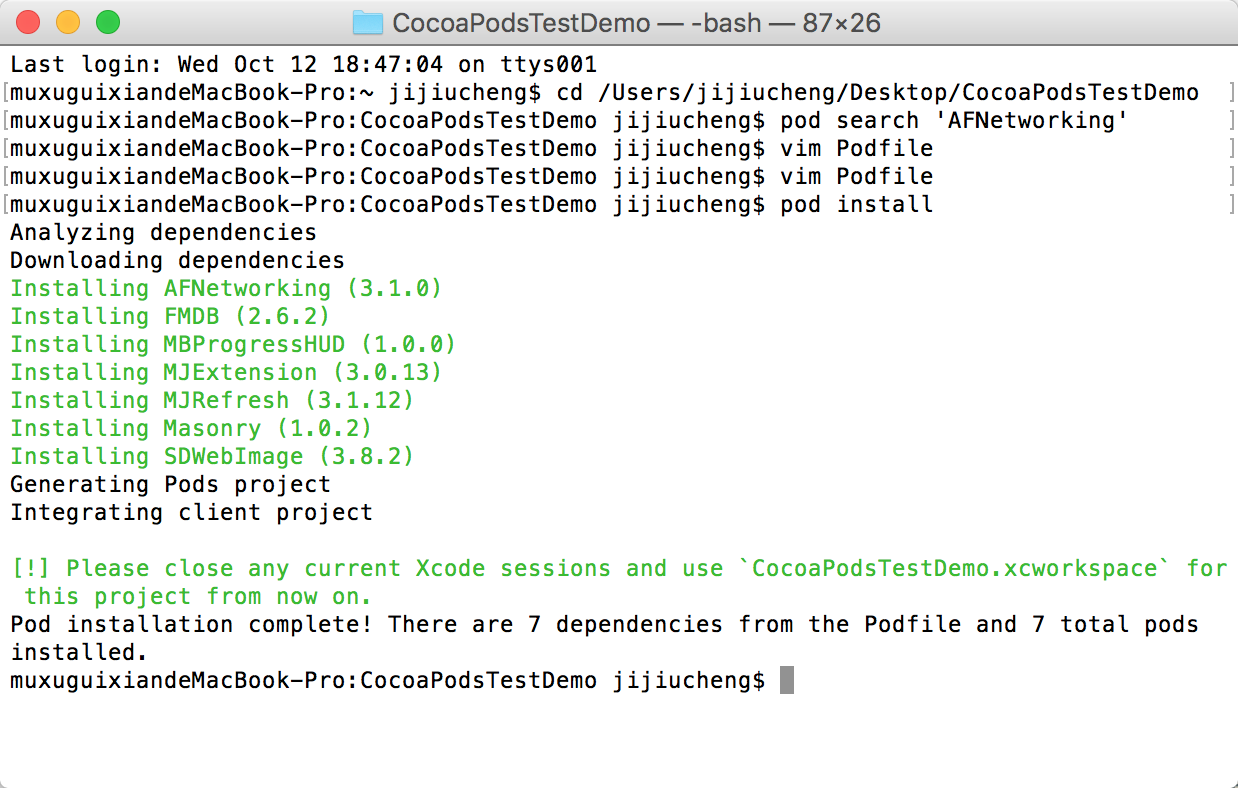
- 第四步:下载第三方库文件到项目工程中
$ pod install
下载输出(如下):
muxuguixiandeMacBook-Pro:CocoaPodsTestDemo jijiucheng$ pod install
Analyzing dependencies
Downloading dependencies
Installing AFNetworking (3.1.0)
Installing FMDB (2.6.2)
Installing MBProgressHUD (1.0.0)
Installing MJExtension (3.0.13)
Installing MJRefresh (3.1.12)
Installing Masonry (1.0.2)
Installing SDWebImage (3.8.2)
Generating Pods project
Integrating client project
[!] Please close any current Xcode sessions and use `CocoaPodsTestDemo.xcworkspace` for this project from now on.
Pod installation complete! There are 7 dependencies from the Podfile and 7 total pods
installed.
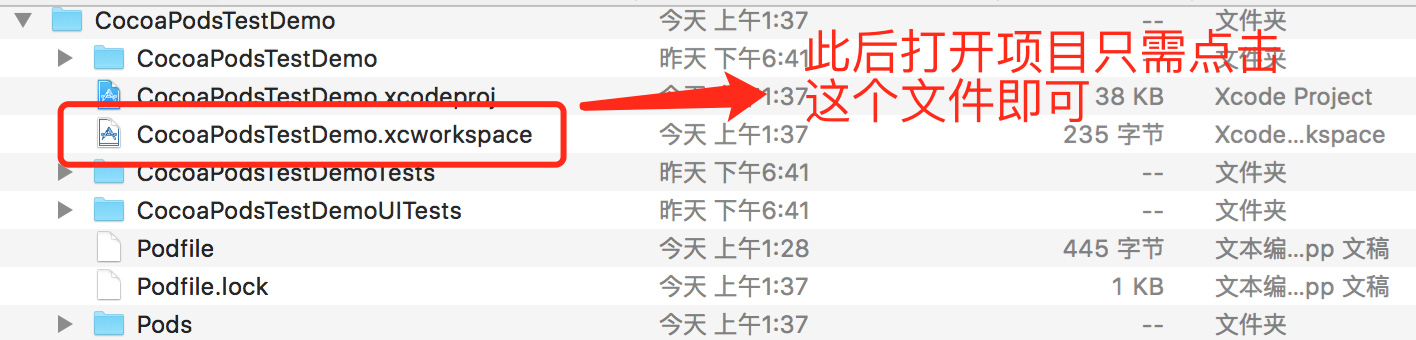
- 第五步:此后打开项目工程只需要点击打开
CocoaPodsTestDemo.xcworkspace文件即可
打开工程文件目录变化(如下):
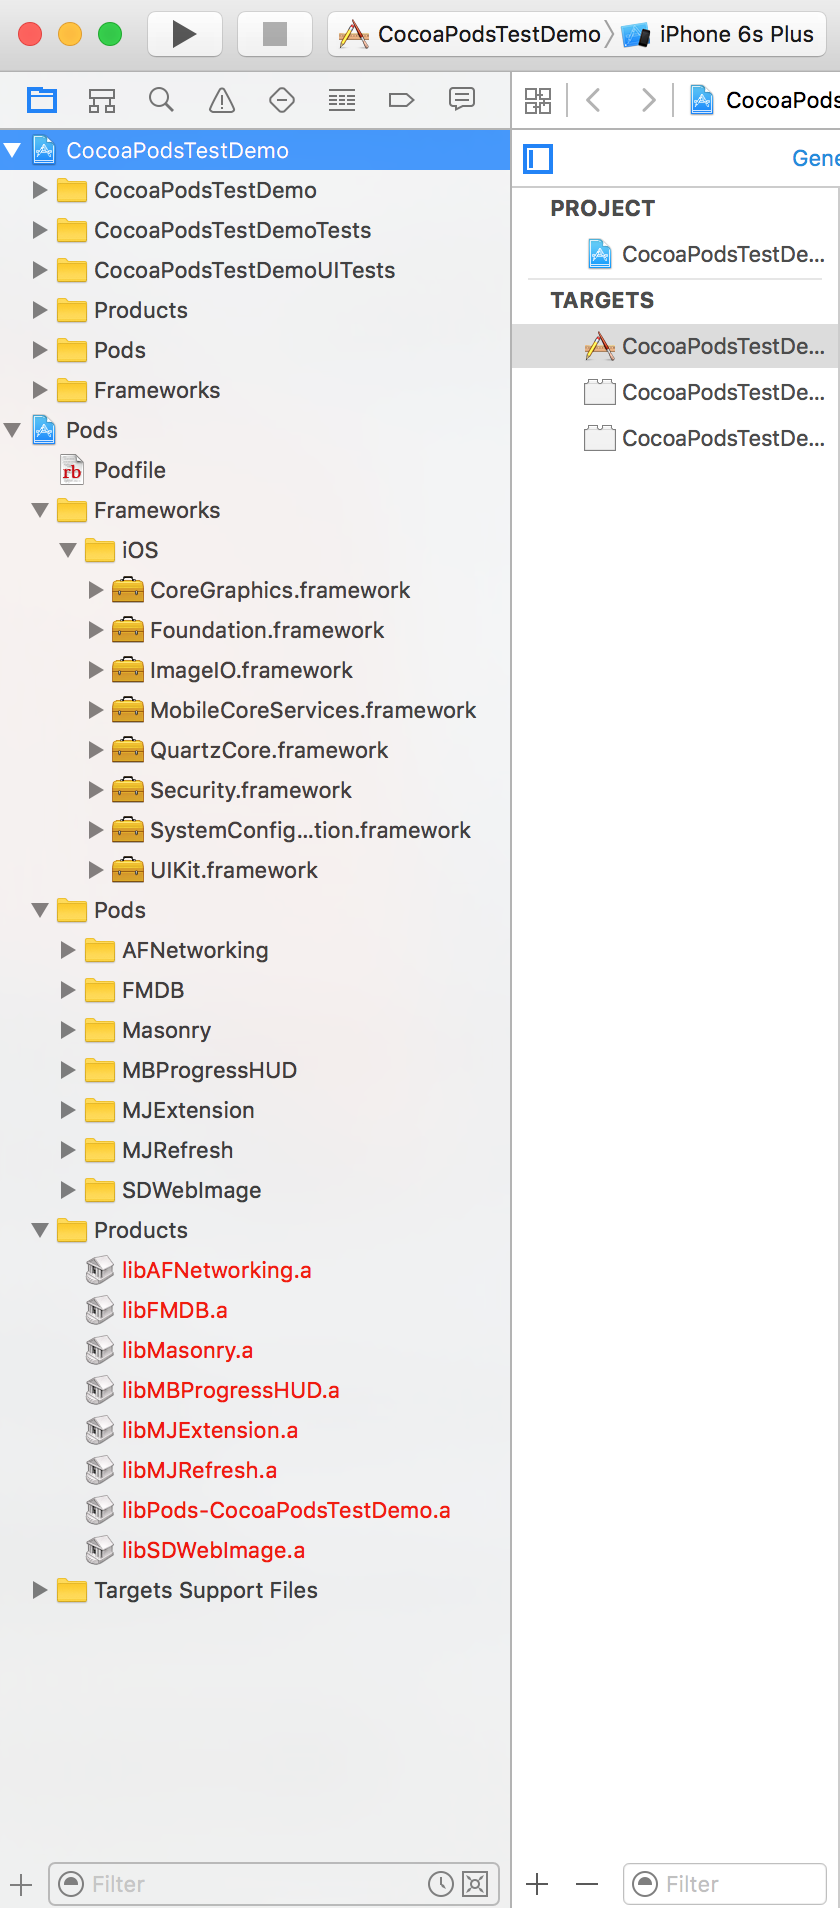
所有的第三方库文件都在 `/CocoaPodsTestDemo/Pods/Pods` 文件夹目录下
三、CocoaPods 安装过程中报错问题解决
说明:此部分所列举的问题均是在执行相关指令时出现的报错
1、Rvm 环境搭建
- 报错一: ① Error running ‘requirements_osx_brew_update_system ruby-2.3.0’, showing last 15 lines of /Users/jijiucheng/.rvm/log/1475769205_ruby-2.3.0/update_system.log ② curl: (35) Server aborted the SSL handshake
① 报错指令:
$ rvm install 2.3.0
② 报错信息:
Error running 'requirements_osx_brew_update_system ruby-2.3.0',
showing last 15 lines of /Users/jijiucheng/.rvm/log/1475769205_ruby-2.3.0/update_system.log
......
......
Requirements installation failed with status: 1.
curl: (35) Server aborted the SSL handshake
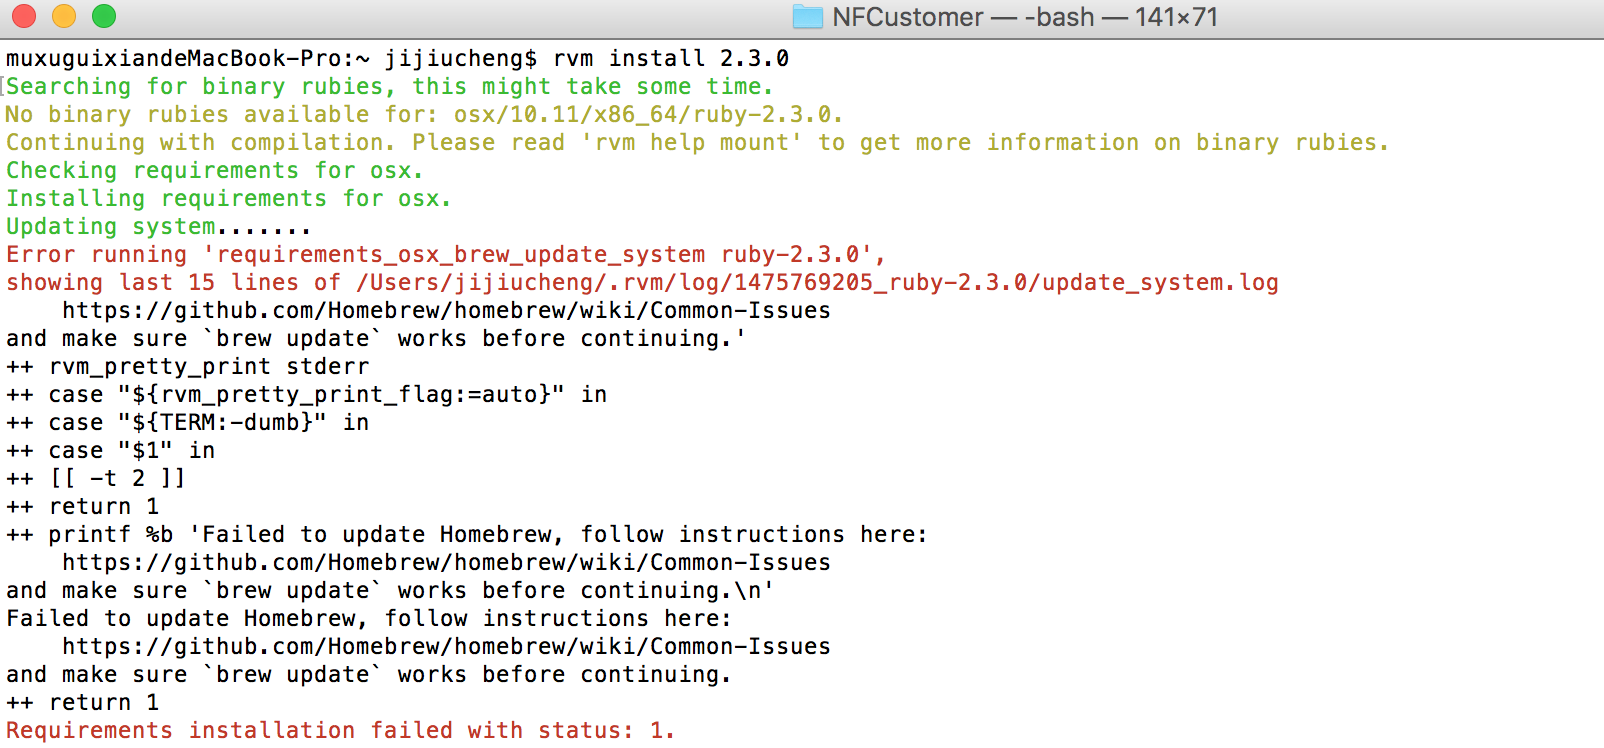
 ③ 报错原因:
 网络问题,因为需要翻墙,所以网络不稳定;建议选择 VPN,保证线路的稳定性。
④ 解决方案( 指令一行一行输入 ):
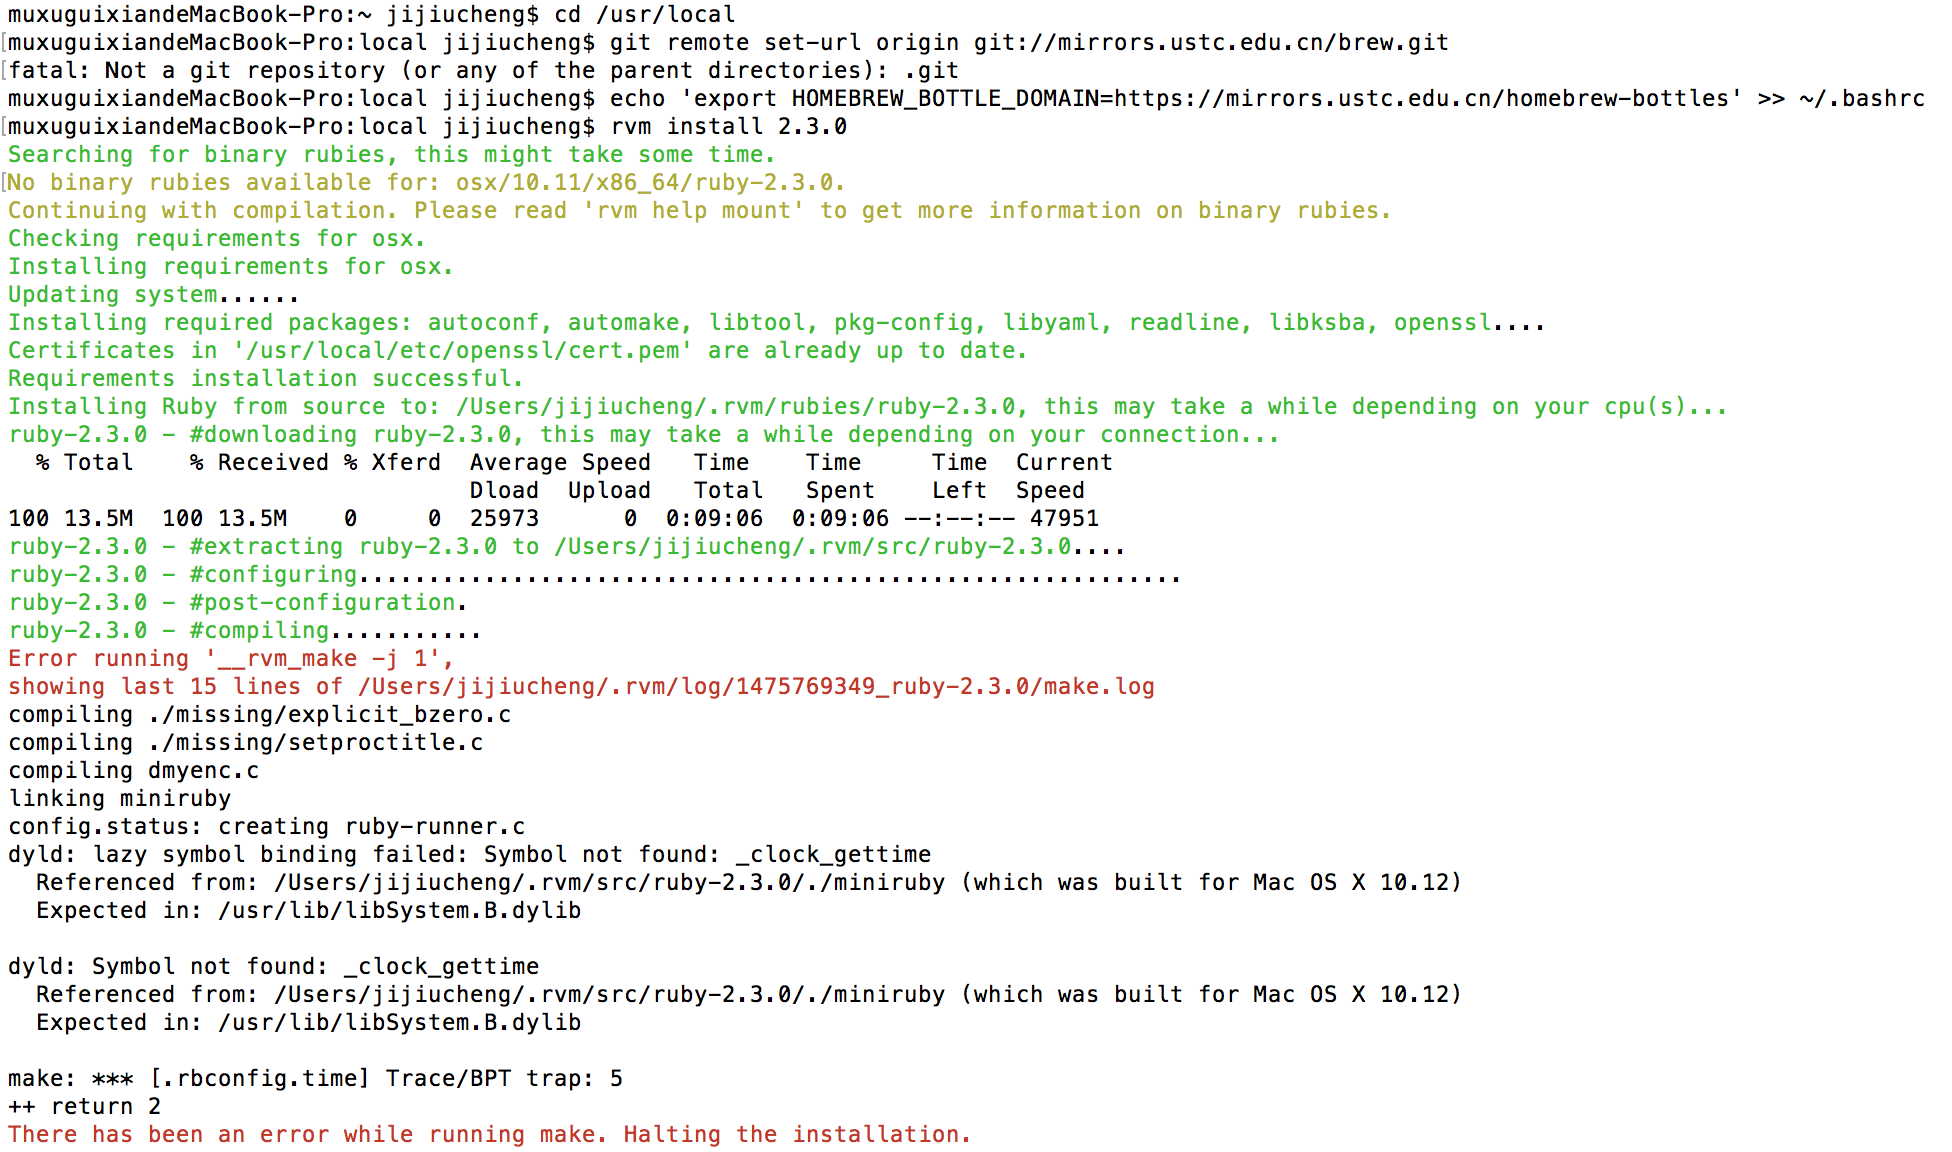
$ cd /usr/local
$ git remote set-url origin git://mirrors.ustc.edu.cn/brew.git
$ echo 'export HOMEBREW_BOTTLE_DOMAIN=https://mirrors.ustc.edu.cn/homebrew-bottles' >> ~/.bashrc
⑤ 方案链接:
报错二: ① Error running ‘__rvm_make -j 1’, showing last 15 lines of /Users/jijiucheng/.rvm/log/1475769349_ruby-2.3.0/make.log
① 报错指令:
$ rvm install 2.3.0
② 报错信息:
Error running '__rvm_make -j 1',
showing last 15 lines of /Users/jijiucheng/.rvm/log/1475769349_ruby-2.3.0/make.log
......
......
There has been an error while running make. Halting the installation.
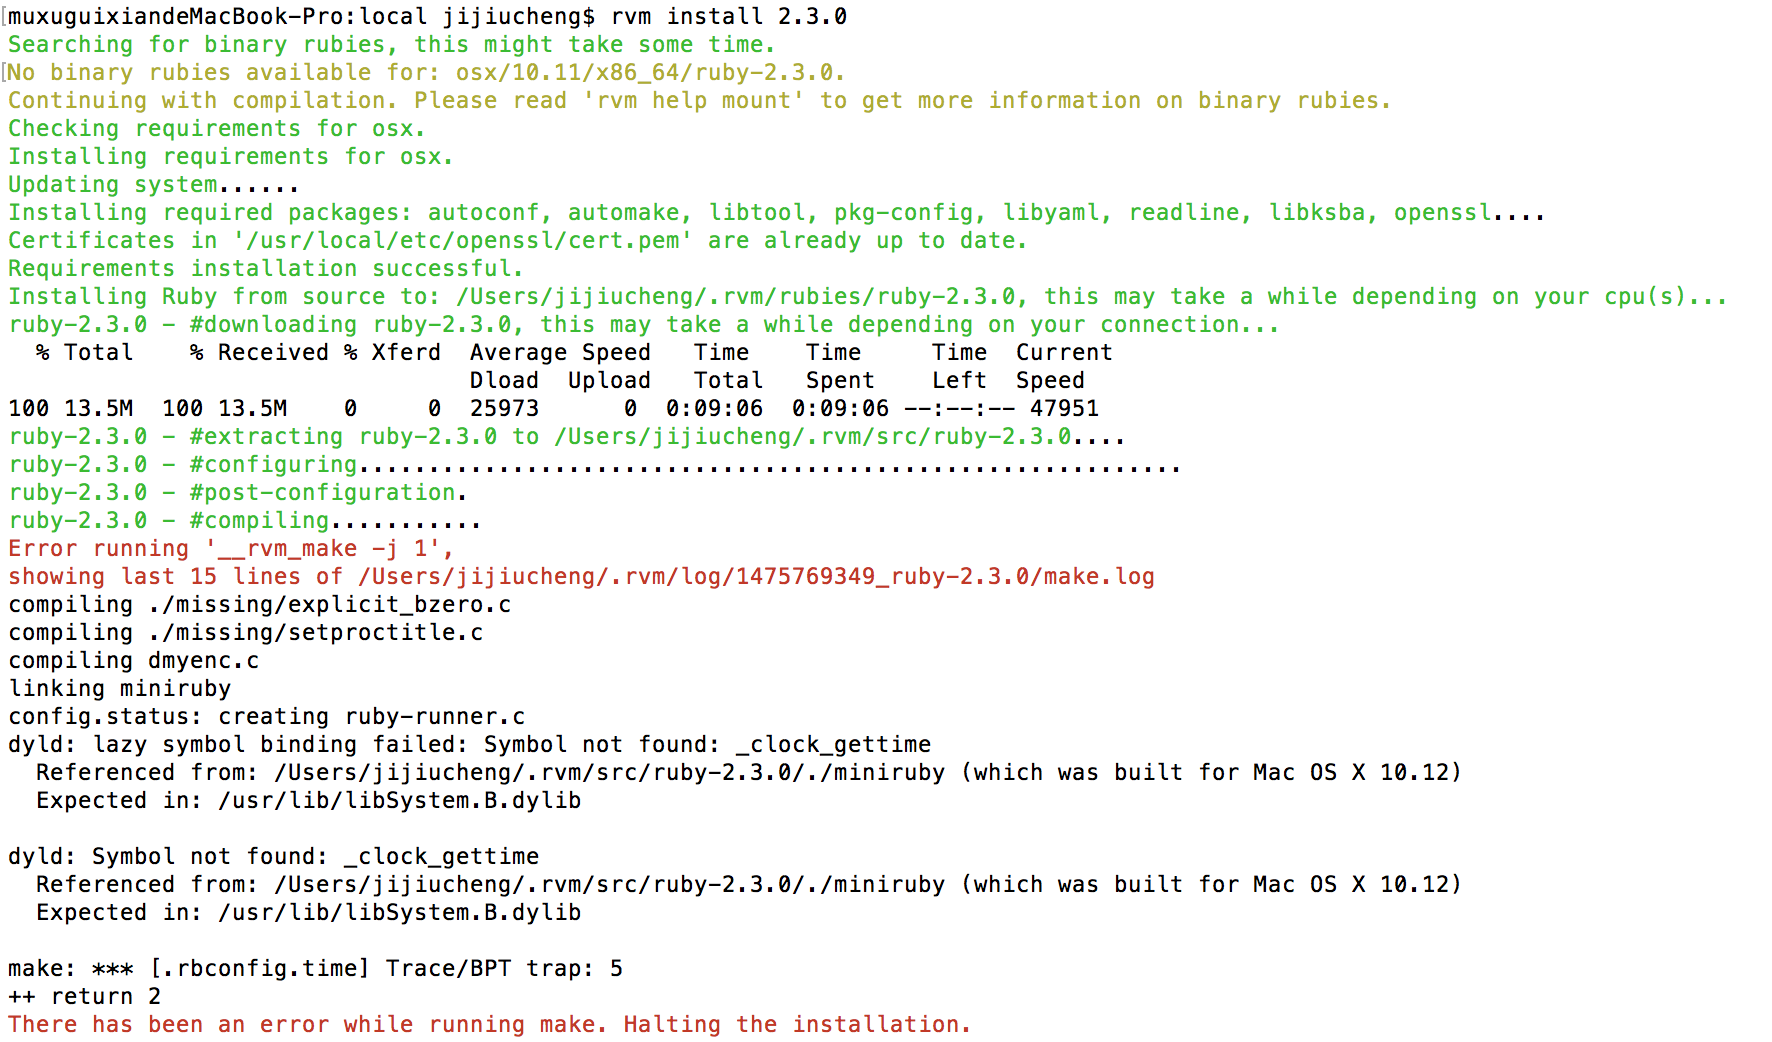 ③ 报错原因:
 缺少 Xcode 工具,xcode command line
④ 解决方案:
$ xcode-select --install

⑤ 方案链接:
方案解决链接 1 - http://stackoverflow.com/questions/35228481/error-running-rvm-make-install
方案解决链接 2 - http://www.th7.cn/Program/Ruby/201609/966343.shtml
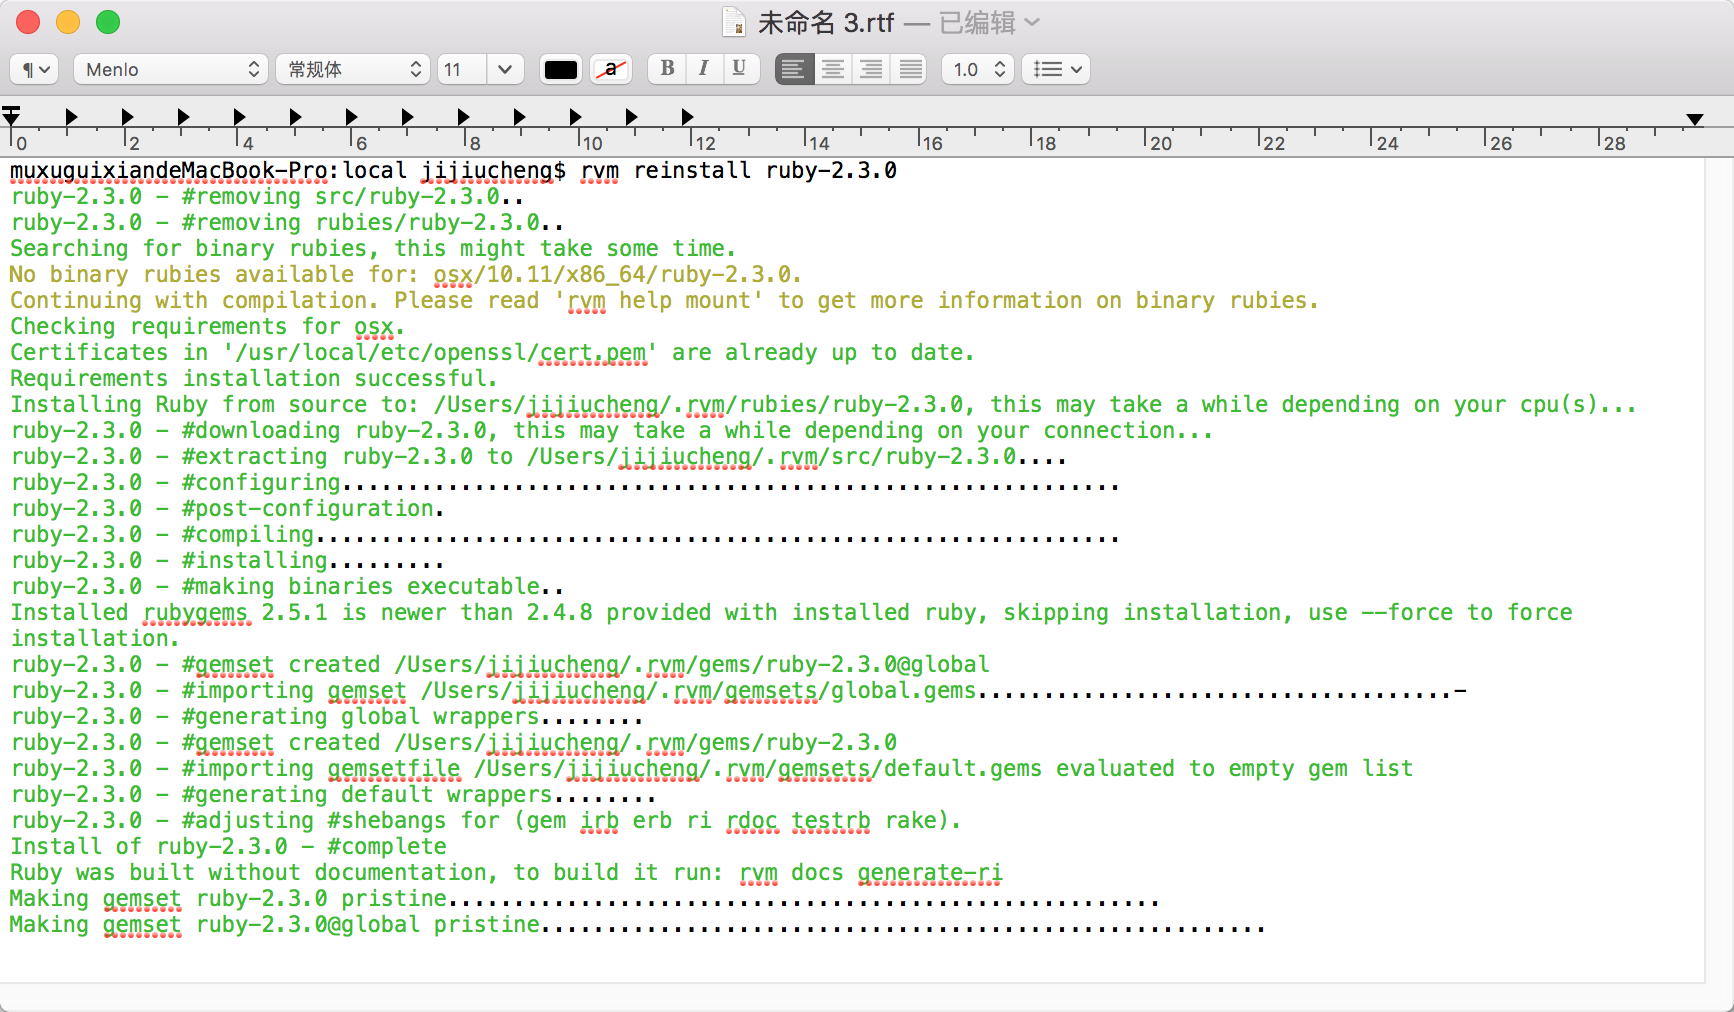
报错三: ① Gemset ‘’ does not exist, ‘rvm ruby-2.3.0 do rvm gemset create ‘ first, or append ‘–create’.
① 报错指令:
$ rvm install 2.3.0
② 报错信息:
muxuguixiandeMacBook-Pro:local jijiucheng$ rvm install 2.3.0
Already installed ruby-2.3.0.
To reinstall use:
.
    rvm reinstall ruby-2.3.0
.
Gemset '' does not exist, 'rvm ruby-2.3.0 do rvm gemset create ' first, or append '--create'.
 ③ 报错原因:
 指令不对,已经存在 ruby-2.3.0 的文件残留,需要重新安装;
④ 解决方案:
$ rvm reinstall ruby-2.3.0
2、Ruby 环境搭建
- 报错一:
3、CocoaPods 安装
4、CocoaPods 配置使用
- 报错一: ① Setting up CocoaPods master repo ② [!] Unable to add a source with url
https://github.com/CocoaPods/Specs.gitnamedmaster. You can try adding it manually in~/.cocoapods/reposor viapod repo add.
① 报错指令:
$ pod install
② 报错信息:
muxuguixiandeMacBook-Pro:NFCustomer jijiucheng$ pod install
Setting up CocoaPods master repo
[!] Unable to add a source with url `https://github.com/CocoaPods/Specs.git` named `master`.
You can try adding it manually in `~/.cocoapods/repos` or via `pod repo add`.
 ③ 报错原因:
 由于安装了多个Xcode导致路径变了,需要变换路径: sudo xcode-select -switch /Applications/Xcode.app sudo xcode-select -switch /Applications/Xcode\ 2.app
④ 解决方案:
$ sudo xcode-select -switch /Applications/Xcode.app
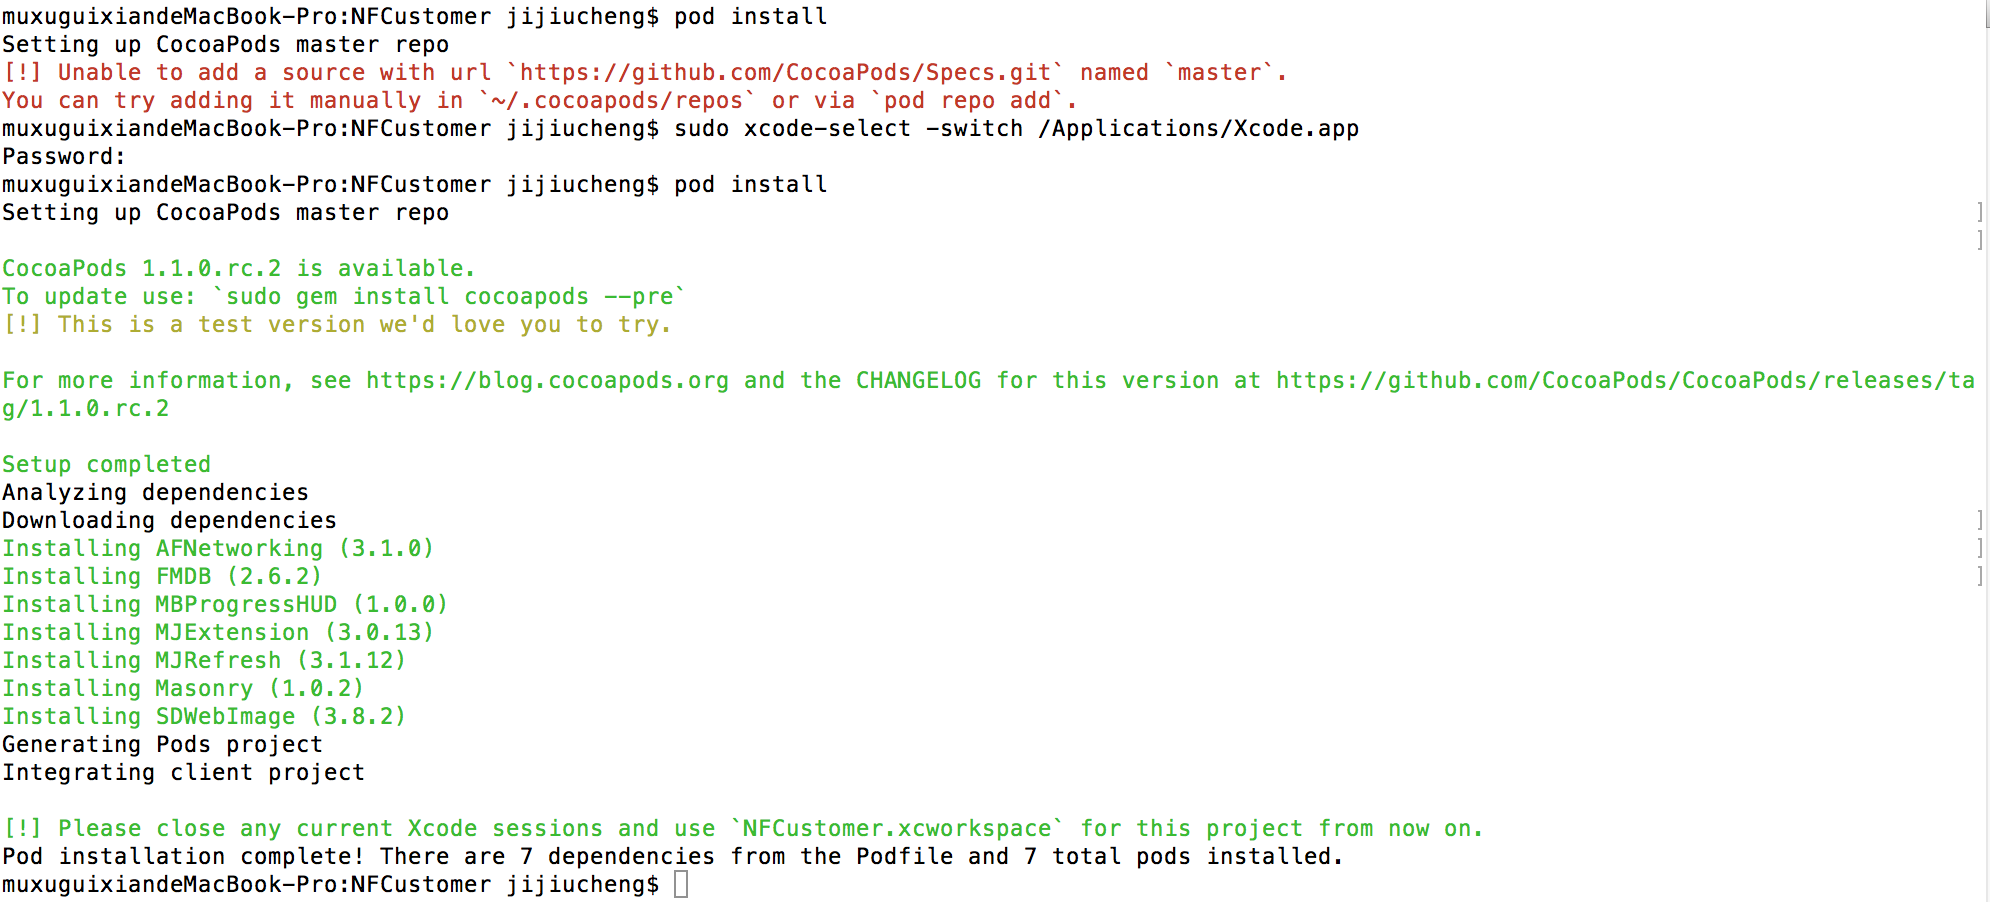 ⑤ 资料补充:
出现 Setting up CocoaPods master repo,说明 Cocoapods 在将它的信息下载到 ~/.cocoapods 里; 新创建终端窗口,输入 cd ~/.cocoapods ,回车,输入 du -sh * 命令来查看文件大小, 每隔几分钟查看一次,这个目录最终大小是100多M( 本人这里大概 800M + ),就是完成了。
⑥ 方案链接:
四、资料补充
1、指令补全
- ① Rvm 指令库
$ ruby -v                     #  查看ruby 版本
$ rvm list known              #  列出已知的 ruby 版本
$ rvm install 2.3.0           #  选择指定 ruby 版本进行更新
$ rvm get stable              #  更新 rvm
$ rvm use 2.2.2               #  切换到指定 ruby 版本
$ rvm use 2.2.2 --default     #  设置指定 ruby 版本为默认版本
$ rvm list                    #  查询已安装的 ruby 版本
$ rvm remove 1.9.2            #  卸载移除 指定 ruby 版本
$ curl -L https://get.rvm.io | bash -s stable                    #  安装 rvm 环境
$ curl -sSL https://get.rvm.io | bash -s stable --ruby           #  默认安装 rvm 最新版本
$ curl -sSL https://get.rvm.io | bash -s stable --ruby=2.3.0     #  安装 rvm 指定版本
$ source ~/.rvm/scripts/rvm                                      #  载入 rvm
- ② gem 指令库
$ gem -v                                  #  查看 gem 版本
$ gem source                              #  查看 gem 配置源
$ gem source -l                           #  查看 gem 配置源目录
$ gem sources -a url                      #  添加 gem 配置源(url 需换成网址)
$ gem sources --add url                   #  添加 gem 配置源(url 需换成网址)
$ gem sources -r url                      #  删除 gem 配置源(url 需换成网址)
$ gem sources --remove url                #  删除 gem 配置源(url 需换成网址)
$ gem update                              #  更新 所有包
$ gem update --system                     #  更新 Ruby Gems 软件
$
$ gem install rake                        #  安装 rake,从本地或远程服务器
$ gem install rake --remote               #  安装 rake,从远程服务器
$ gem install watir -v 1.6.2              #  安装 指定版本的 watir
$ gem install watir --version 1.6.2       #  安装 指定版本的 watir
$ gem uninstall rake                      #  卸载 rake 包
$ gem list d                              #  列出 本地以 d 打头的包
$ gem query -n ''[0-9]'' --local          #  查找 本地含有数字的包
$ gem search log --both                   #  查找 从本地和远程服务器上查找含有 log 字符串的包
$ gem search log --remoter                #  查找 只从远程服务器上查找含有 log 字符串的包
$ gem search -r log                       #  查找 只从远程服务器上查找含有log字符串的包
$
$ gem help                                #  提醒式的帮助
$ gem help install                        #  列出 install 命令 帮助
$ gem help examples                       #  列出 gem 命令使用一些例子
$ gem build rake.gemspec                  #  把 rake.gemspec 编译成 rake.gem
$ gem check -v pkg/rake-0.4.0.gem         #  检测 rake 是否有效
$ gem cleanup                             #  清除 所有包旧版本,保留最新版本
$ gem contents rake                       #  显示 rake 包中所包含的文件
$ gem dependency rails -v 0.10.1          #  列出 与 rails 相互依赖的包
$ gem environment                         #  查看 gem 的环境
$
$ sudo gem -v                             #  查看 gem 版本(以管理员权限)
$ sudo gem install cocoa pods             #  安装 CocoaPods(以管理员权限)
$ sudo gem install cocoapods              #  安装 CocoaPods(以管理员权限)
$ sudo gem install cocoapods --pre        #  安装 CocoaPods 至预览版(以管理员权限)
$ sudo gem install cocoapods -v 0.39.0    #  安装 CocoaPods 指定版本(以管理员权限)
$ sudo gem update cocoapods               #  更新 CocoaPods 至最新版(以管理员权限)
$ sudo gem update cocoapods --pre         #  更新 CocoaPods 至预览版(以管理员权限)
$ sudo gem uninstall cocoapods -v 0.39.0  #  移除 CocoaPods 指定版本(以管理员权限)
- ③ pod 指令库
$ pod setup                         #  CocoaPods 将信息下载到~/.cocoapods/repos 目录下。如果安装 CocoaPods 时不执行此命令,在初次执行 pod intall 命令时,系统也会自动执行该指令
$ pod --version                     #  检查 CocoaPods 是否安装成功及其版本号
$ pod install                       #  安装 CocoaPods 的配置文件 Podfile
五、引用资料
说明:此处是列举了我安装 CocoaPods 和写这篇文章时查询引用的文章,如有涉及到版权问题,请联系,我会删除的。
- 01 - Rvm、Ruby 及 Cocoapods 安装
- 02 - RVM 和 Ruby 的安装
- 03 - iOS 的库依赖管理工具 CocoaPods
- 04 - CocoaPods 的安装以及遇到的坑
- 05 - ios 开发怎样卸载已经安装的 cocoapod
- 06 - 配置 CocoaPods 前 - 本地安装好 Ruby 环境
- 07 - iOS 学习笔记二【cocopods 安装使用和安装过程中遇到的问题及解决办法】【20160725 更新】
- 08 - ruby 学习及编译 ruby 缺少 openssl 问题解决
- 09 - 如何在本地安装多个版本的 CocoaPods
- 01 - 解决升级 EI Capiton CocoaPods “pod: command not found”
- 02 - curl: (35) Server aborted the SSL handshake
- 03 - 第一种 - Error running ‘__rvm_make -j 1’
- 04 - 第二种 - Error running ‘__rvm_make -j 1’
- 05 - [!] Unable to add a source with url “xxxxxxxxxxxxx”
- 06 - Error running ‘requirements_osx_brew_update_system ruby-2.0.0-p643’
- 07 - 关于安装 cocoapods 遇到的一些坑(ERROR: Error installing cocoapods: activesupport requires Ruby version >= 2.2)
- 08 - Homebrew install: Failed during: git fetch origin master:refs/remotes/origin/master -n –depth=1
- 09 - Pod /usr/bin/git clone https://github.com/CocoaPods/Specs.git master
- 10 -命令行执行命令时报错 You don’t have write permissions for the /Library/***
- 11 -gem install cocoapods ERROR: While executing gem … (Gem::FilePermissionError)
- 12 - zsh: /usr/local/bin/pod: bad interpreter: /System/Library/Frameworks/Ruby.framework/Versions/2.3/usr/bin/ruby: no such file or directory
- 13 - [!] CDN: trunk Repo update failed
- 14 - Homebrew installation on Mac OS X Failed to connect to raw.githubusercontent.com port 443
- 15 - 安装 homebrew 报错 curl: (7) Failed to connect to raw.githubusercontent.com port 443: Operation
- 16 - 简书 - 新生代农民工 No1 - CocoaPods 私有库制作
六、后续更新
2016.12.15 问题更新
- 安装 CocoaPods 步骤指令问题
① 最初写的:
由于 OS X 系统的不同,此处的指令也是有些变化:
OS X 10.11之前系统的安装 CocoaPods 指令: $ sudo gem install cocoapods
OS X 10.11以后系统的安装 CocoaPods 指令: $ sudo gem install -n /usr/local/bin cocoa pods
② 更改原因: 因为有朋友说在 mac OS 10.11 和 mac OS 10.12 环境中所用的指令不一样,当时写这篇文章的时候环境是 mac OS 10.11 ,但是并没有做 mac OS 10.12 的环境,今天又做了一下测试,现在的环境是 mac OS 10.12.1。 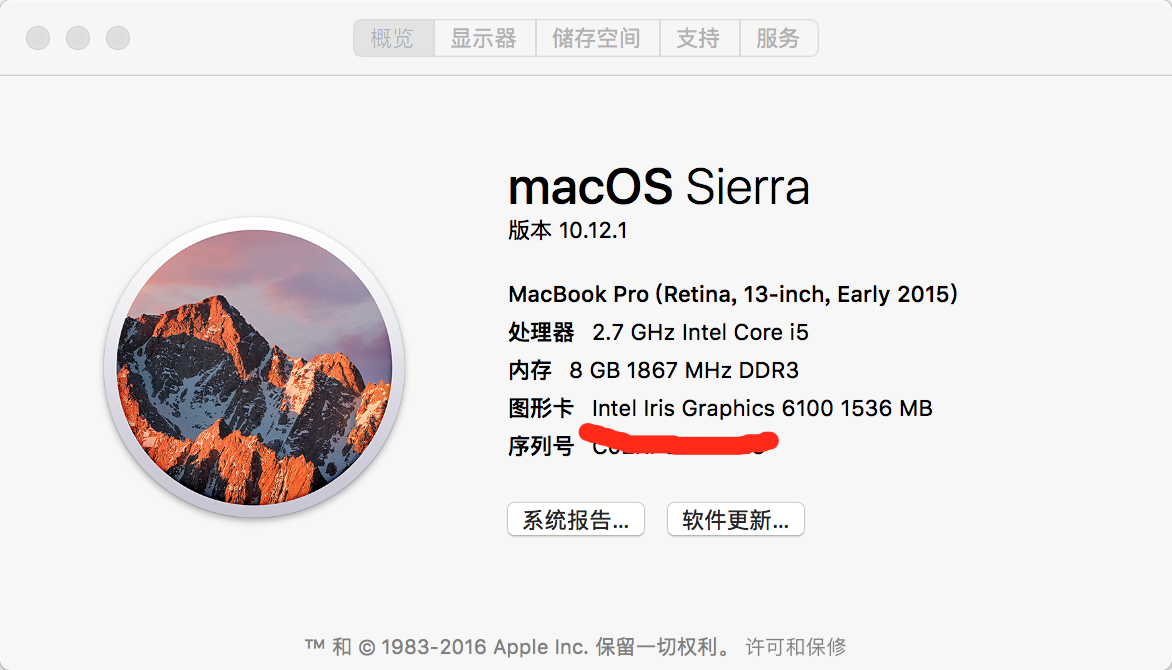
③ 测试结果:
----> 指令: ----> $ sudo gem install cocoa pods ----> 不需要密码
----> 指令: ----> $ sudo gem install cocoapods ----> 需要密码
----> 指令: ----> $ sudo gem install -n /usr/local/bin cocoa pods ----> 需要密码
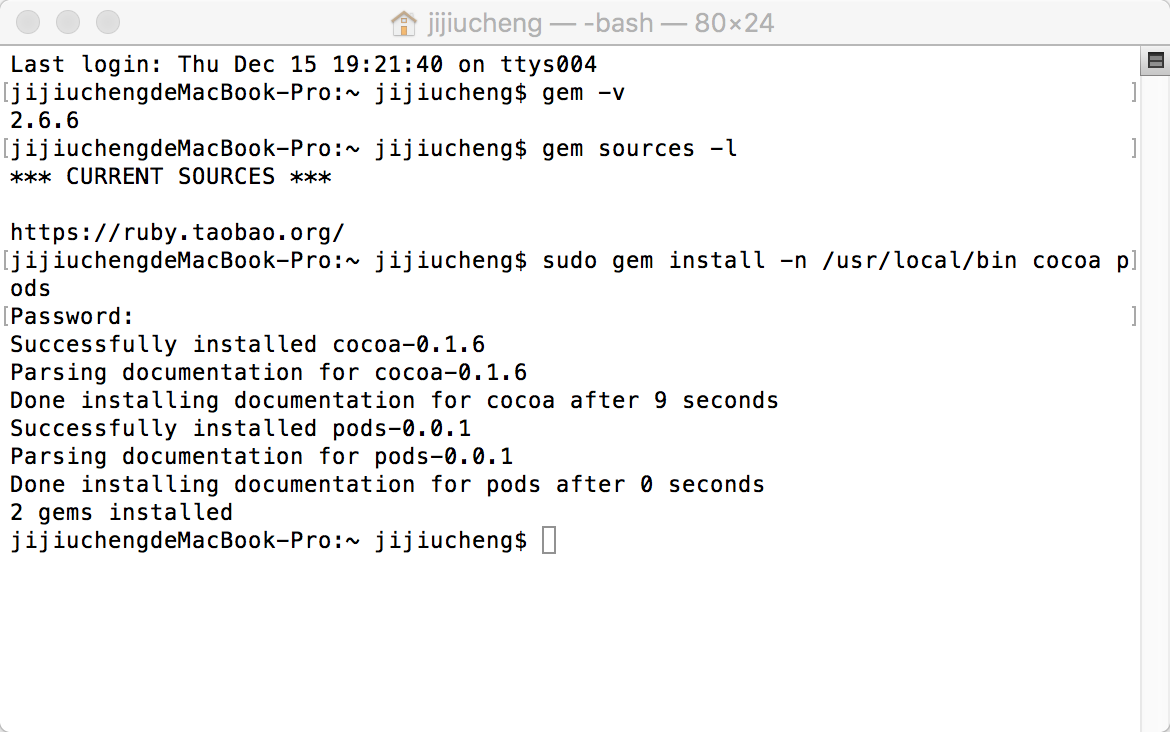
④ 测试结论:
三种结果都能安装 Cocoapods 成功,只不过安装更新的内容略有不同。 推荐使用:指令:$ sudo gem install cocoapods
2018.04.08 更新
- 1、报错信息
RuntimeError - [Xcodeproj] Unknown object version.
RuntimeError - [Xcodeproj] Unknown object version.
/usr/local/lib/ruby/gems/2.3.0/gems/xcodeproj-1.5.1/lib/xcodeproj/project.rb:217:in `initialize_from_file'
/usr/local/lib/ruby/gems/2.3.0/gems/xcodeproj-1.5.1/lib/xcodeproj/project.rb:102:in `open'
/usr/local/lib/ruby/gems/2.3.0/gems/cocoapods-1.3.1/lib/cocoapods/installer/analyzer.rb:903:in `block (2 levels) in inspect_targets_to_integrate'
/usr/local/lib/ruby/gems/2.3.0/gems/cocoapods-1.3.1/lib/cocoapods/installer/analyzer.rb:902:in `each'
/usr/local/lib/ruby/gems/2.3.0/gems/cocoapods-1.3.1/lib/cocoapods/installer/analyzer.rb:902:in `block in inspect_targets_to_integrate'
/usr/local/lib/ruby/gems/2.3.0/gems/cocoapods-1.3.1/lib/cocoapods/user_interface.rb:64:in `section'
/usr/local/lib/ruby/gems/2.3.0/gems/cocoapods-1.3.1/lib/cocoapods/installer/analyzer.rb:897:in `inspect_targets_to_integrate'
/usr/local/lib/ruby/gems/2.3.0/gems/cocoapods-1.3.1/lib/cocoapods/installer/analyzer.rb:69:in `analyze'
/usr/local/lib/ruby/gems/2.3.0/gems/cocoapods-1.3.1/lib/cocoapods/installer.rb:242:in `analyze'
/usr/local/lib/ruby/gems/2.3.0/gems/cocoapods-1.3.1/lib/cocoapods/installer.rb:154:in `block in resolve_dependencies'
/usr/local/lib/ruby/gems/2.3.0/gems/cocoapods-1.3.1/lib/cocoapods/user_interface.rb:64:in `section'
/usr/local/lib/ruby/gems/2.3.0/gems/cocoapods-1.3.1/lib/cocoapods/installer.rb:153:in `resolve_dependencies'
/usr/local/lib/ruby/gems/2.3.0/gems/cocoapods-1.3.1/lib/cocoapods/installer.rb:116:in `install!'
/usr/local/lib/ruby/gems/2.3.0/gems/cocoapods-1.3.1/lib/cocoapods/command/install.rb:41:in `run'
/usr/local/lib/ruby/gems/2.3.0/gems/claide-1.0.2/lib/claide/command.rb:334:in `run'
/usr/local/lib/ruby/gems/2.3.0/gems/cocoapods-1.3.1/lib/cocoapods/command.rb:52:in `run'
/usr/local/lib/ruby/gems/2.3.0/gems/cocoapods-1.3.1/bin/pod:55:in `<top (required)>'
/usr/local/bin/pod:22:in `load'
/usr/local/bin/pod:22:in `<main>'

――― TEMPLATE END ――――――――――――――――――――――――――――――――――――――――――――――――――――――――――――――――

[!] Oh no, an error occurred.
- 2、报错原因
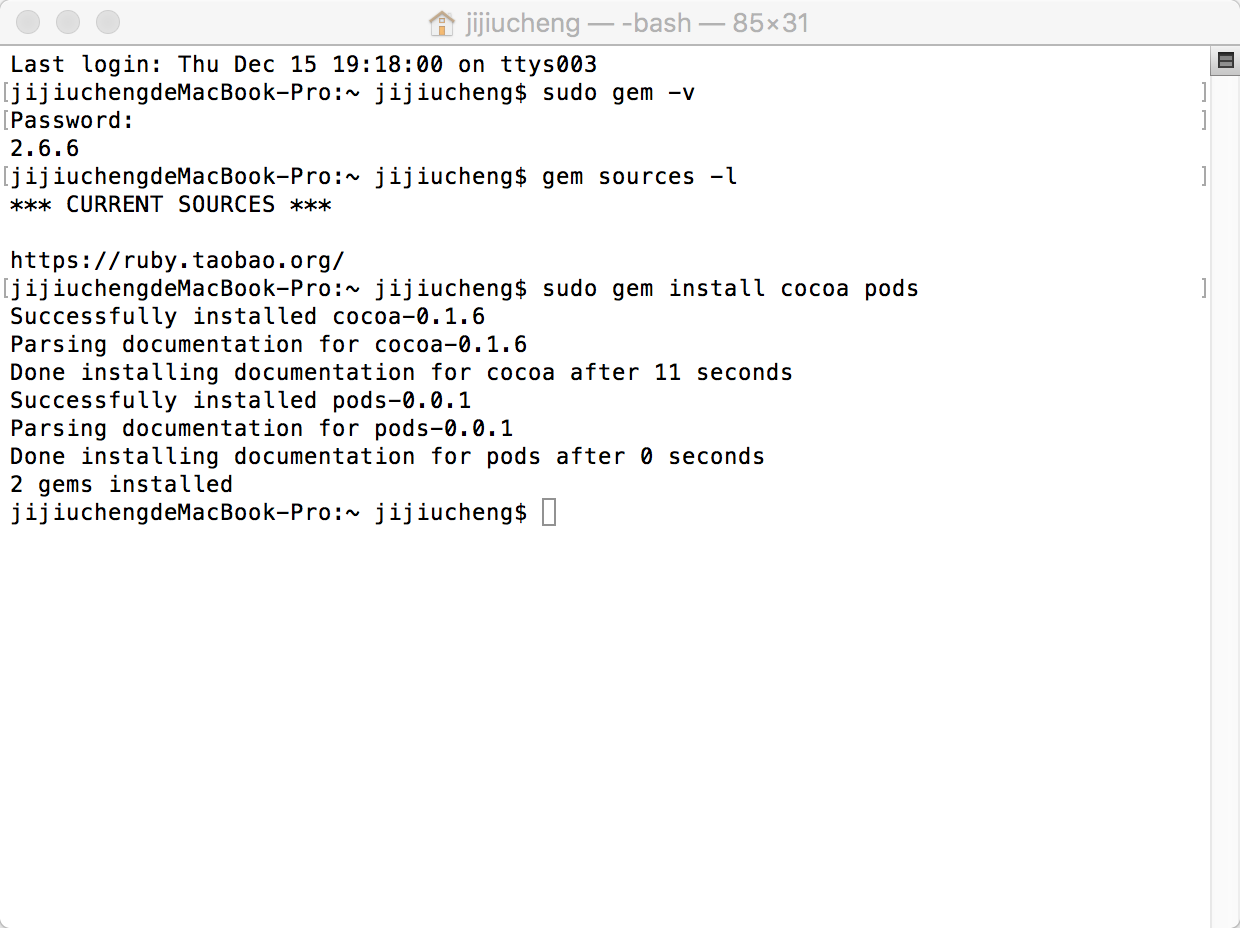
主要原因就是 Xcode 当前版本和 当前的 CocoaPods 的版本问题不匹配,需要对当前 CocoaPods 进行安装更新。

博主当前 Xcode Version 9.3 (9E145) ;
gem -v             2.6.6
- 3、解决办法
方法一:
① 终端执行   gem install cocoapods --pre  命令;
② cd 对应项目目录,pod install。

方法二:
① 终端执行 sudo gem update cocoapods 命令。
2018.07.23 更新
- 1、报错信息
jijiuchengdeMacBook-Pro:lemon-ios jijiucheng$ pod install
Analyzing dependencies
Downloading dependencies
Using AFNetworking (3.2.1)
Using Bugly (2.5.0)
Using FMDB (2.7.2)
Using IQKeyboardManager (6.0.4)
Installing JJCTools (0.1.8)

[!] Error installing JJCTools
[!] /usr/bin/git clone https://github.com/jijiucheng/JJCTools.git /var/folders/g6/t4gwthjn1w3f8pyy0kv_fj800000gn/T/d20180723-35368-1q363aj --template= --single-branch --depth 1 --branch 0.1.8

Cloning into '/var/folders/g6/t4gwthjn1w3f8pyy0kv_fj800000gn/T/d20180723-35368-1q363aj'...
error: RPC failed; curl 56 LibreSSL SSL_read: SSL_ERROR_SYSCALL, errno 54
fatal: The remote end hung up unexpectedly
fatal: early EOF
fatal: unpack-objects failed


[!] Automatically assigning platform `ios` with version `8.0` on target `lemon` because no platform was specified. Please specify a platform for this target in your Podfile. See `https://guides.cocoapods.org/syntax/podfile.html#platform`.
- 2、解决办法
因为本人使用的是 SourceTree,所以本人是在具体项目界面的,点击右上角 Settings --> Remotes --> Edit Config File... --> 输入 `[http]
        postBuffer = 524288000`  增大缓存空间。

保存后再次 pod install 则解决了。
另外见到一种方法,但是没有测试:

git clone https://git.coding.net/CocoaPods/Specs.git ~/.cocoapods/repos/master
3、参考链接
2018.10.10 更新
- 1、报错信息
jijiuchengdeMacBook-Pro:~ jijiucheng$ gem sources -l
*** CURRENT SOURCES ***

https://rubygems.org/
jijiuchengdeMacBook-Pro:~ jijiucheng$ gem sources --remove https://rubygems.org/
https://rubygems.org/ removed from sources
jijiuchengdeMacBook-Pro:~ jijiucheng$ gem sources --add https://gems.ruby-china.org
Error fetching https://gems.ruby-china.org:
	bad response Not Found 404 (https://gems.ruby-china.org/specs.4.8.gz)
- 2、解决办法
将 `gem sources --add https://gems.ruby-china.org` 替换成 `gem sources --add https://gems.ruby-china.com` 即可
2019.12.14 更新
1、问题一:-bash: /usr/local/bin/pod: /System/Library/Frameworks/Ruby.framework/Versions/2.3/usr/bin/ruby: bad interpreter: No such file or directory
- 1、报错信息
mxgx:PetBar mxgx$ pod --version
-bash: /usr/local/bin/pod: /System/Library/Frameworks/Ruby.framework/Versions/2.3/usr/bin/ruby: bad interpreter: No such file or directory
- 2、解决办法
主要是因为升级
macOS Catalina version 10.15引起的cocoapods无法使用了。
mxgx:PetBar mxgx$ sudo gem update --system
Latest version already installed. Done.
mxgx:PetBar mxgx$ sudo gem install cocoapods -n/usr/local/bin
Successfully installed cocoapods-1.8.4
Parsing documentation for cocoapods-1.8.4
Done installing documentation for cocoapods after 1 seconds
1 gem installed
mxgx:PetBar mxgx$ pod --version
1.8.4
2、问题二:[!] CDN: trunk Repo update failed - 127 error(s):
- 1、报错信息
mxgx:PetBar mxgx$ pod install
Analyzing dependencies
Adding spec repo `trunk` with CDN `https://cdn.cocoapods.org/`
[!] CDN: trunk Repo update failed - 127 error(s):
CDN: trunk URL couldn't be downloaded: https://raw.githubusercontent.com/CocoaPods/Specs/master/Specs/a/a/6/Kingfisher/0.0.1/Kingfisher.podspec.json, error: Failed to open TCP connection to raw.githubusercontent.com:443 (Connection refused - connect(2) for "raw.githubusercontent.com" port 443)
CDN: trunk URL couldn't be downloaded: https://raw.githubusercontent.com/CocoaPods/Specs/master/Specs/a/a/6/Kingfisher/0.0.2/Kingfisher.podspec.json, error: Failed to open TCP connection to raw.githubusercontent.com:443 (Connection refused - connect(2) for "raw.githubusercontent.com" port 443)
CDN: trunk URL couldn't be downloaded: https://raw.githubusercontent.com/CocoaPods/Specs/master/Specs/a/a/6/Kingfisher/1.0.0/Kingfisher.podspec.json, error: Failed to open TCP connection to raw.githubusercontent.com:443 (Connection refused - connect(2) for "raw.githubusercontent.com" port 443)
- 2、解决办法
主要是因为默认源的变更。 只需要在 Podfile 文件里添加
source 'https://github.com/CocoaPods/Specs.git',并执行指令pod repo remove trunk即可。
platform :ios, '11.0'

target 'PetBar' do
use_frameworks!

	pod 'Kingfisher'
	pod 'Alamofire'
	pod 'SwiftyJSON'
	pod 'SnapKit'
	pod 'RxSwift'
	pod 'RxCocoa'
	pod 'PKHUD'
	pod 'IQKeyboardManagerSwift'
	pod 'R.swift'

source 'https://github.com/CocoaPods/Specs.git'

end
mxgx:PetBar mxgx$ pod repo remove trunk
Removing spec repo `trunk`
mxgx:PetBar mxgx$ pod install
Analyzing dependencies
Downloading dependencies
Installing Alamofire (4.8.2)
Installing IQKeyboardManagerSwift (6.4.0)
Installing Kingfisher (5.7.0)
Installing PKHUD (5.3.0)
Installing R.swift (5.0.3)
Installing R.swift.Library (5.0.1)
Installing RxCocoa (5.0.0)
Installing RxRelay (5.0.0)
Installing RxSwift (5.0.0)
Installing SnapKit (5.0.0)
Installing SwiftyJSON (5.0.0)
Generating Pods project
Integrating client project

[!] Please close any current Xcode sessions and use `PetBar.xcworkspace` for this project from now on.
Pod installation complete! There are 9 dependencies from the Podfile and 11 total pods installed.
3、问题三:curl: (7) Failed to connect to raw.githubusercontent.com port 443: Connection refused
- 1、报错信息
mxgx:PetBar mxgx$ rvm -v
-bash: rvm: command not found
mxgx:PetBar mxgx$ curl -L https://get.rvm.io | bash -s stable
  % Total    % Received % Xferd  Average Speed   Time    Time     Time  Current
                                 Dload  Upload   Total   Spent    Left  Speed
100   194  100   194    0     0      4      0  0:00:48  0:00:41  0:00:07    48
  0     0    0     0    0     0      0      0 --:--:--  0:00:41 --:--:--     0
curl: (7) Failed to connect to raw.githubusercontent.com port 443: Connection refused
mxgx:PetBar mxgx$ rvm -v
-bash: rvm: command not found
mxgx:PetBar mxgx$ curl -L https://get.rvm.io | bash -s stable
  % Total    % Received % Xferd  Average Speed   Time    Time     Time  Current
                                 Dload  Upload   Total   Spent    Left  Speed
100   194  100   194    0     0    176      0  0:00:01  0:00:01 --:--:--   176
  0     0    0     0    0     0      0      0 --:--:--  0:00:01 --:--:--     0
curl: (7) Failed to connect to raw.githubusercontent.com port 443: Connection refused
- 2、解决办法
主要原因暂时位置,只找到了解决办法。
先将 https://raw.githubusercontent.com/Homebrew/install/master/install 输入到浏览器中看是否能打开,如果能打开,右击
save as保存名为brew_install.rb网页到任意目录下(只要能找的到)。打开终端,
cd到对应的文件目录,依次执行下面指令即可。
mxgx:~ mxgx$ cd Desktop/
mxgx:PetBar mxgx$ curl
curl: try 'curl --help' or 'curl --manual' for more information
mxgx:Desktop mxgx$ ruby brew_install.rb
==> This script will install:
...
...
mxgx:PetBar mxgx$ curl
curl: try 'curl --help' or 'curl --manual' for more information
mxgx:PetBar mxgx$ cd ~
mxgx:~ mxgx$ ls
Applications			Library				Postman
Carfile				Movies				Public
Desktop				Music				Virtual Machines.localized
Documents			Parallels			WeChatProjects
Downloads			Pictures
mxgx:~ mxgx$ cd Desktop/
mxgx:Desktop mxgx$ ruby brew_install.rb
==> This script will install:
/usr/local/bin/brew
/usr/local/share/doc/homebrew
/usr/local/share/man/man1/brew.1
/usr/local/share/zsh/site-functions/_brew
/usr/local/etc/bash_completion.d/brew
/usr/local/Homebrew
==> The following existing directories will be made group writable:
/usr/local/include
/usr/local/lib
/usr/local/lib/pkgconfig
==> The following existing directories will have their owner set to mxgx:
/usr/local/include
/usr/local/lib
/usr/local/lib/pkgconfig
==> The following existing directories will have their group set to admin:
/usr/local/include
/usr/local/lib
/usr/local/lib/pkgconfig
==> The Xcode Command Line Tools will be installed.

Press RETURN to continue or any other key to abort
==> /usr/bin/sudo /bin/chmod u+rwx /usr/local/include /usr/local/lib /usr/local/lib/pkgconfig
Password:
==> /usr/bin/sudo /bin/chmod g+rwx /usr/local/include /usr/local/lib /usr/local/lib/pkgconfig
==> /usr/bin/sudo /usr/sbin/chown mxgx /usr/local/include /usr/local/lib /usr/local/lib/pkgconfig
==> /usr/bin/sudo /usr/bin/chgrp admin /usr/local/include /usr/local/lib /usr/local/lib/pkgconfig
==> Searching online for the Command Line Tools
==> /usr/bin/sudo /usr/bin/touch /tmp/.com.apple.dt.CommandLineTools.installondemand.in-progress
==> Installing Command Line Tools for Xcode-11.3
==> /usr/bin/sudo /usr/sbin/softwareupdate -i Command\ Line\ Tools\ for\ Xcode-11.3
Software Update Tool


Downloading Command Line Tools for Xcode

Downloaded Command Line Tools for Xcode
Installing Command Line Tools for Xcode

Done with Command Line Tools for Xcode
Done.
==> /usr/bin/sudo /bin/rm -f /tmp/.com.apple.dt.CommandLineTools.installondemand.in-progress
==> /usr/bin/sudo /usr/bin/xcode-select --switch /Library/Developer/CommandLineTools
==> Downloading and installing Homebrew...
remote: Enumerating objects: 6, done.
remote: Counting objects: 100% (6/6), done.
remote: Compressing objects: 100% (6/6), done.
remote: Total 6 (delta 0), reused 0 (delta 0), pack-reused 0
Unpacking objects: 100% (6/6), done.
From https://github.com/Homebrew/brew
   b1eb96dfd..e78836fda  master     -> origin/master
HEAD is now at e78836fda Merge pull request #6832 from Homebrew/dependabot/bundler/Library/Homebrew/json-2.3.0
Already up-to-date.
==> Installation successful!

==> Homebrew has enabled anonymous aggregate formulae and cask analytics.
Read the analytics documentation (and how to opt-out) here:
  https://docs.brew.sh/Analytics

==> Homebrew is run entirely by unpaid volunteers. Please consider donating:
  https://github.com/Homebrew/brew#donations
==> Next steps:
- Run `brew help` to get started
- Further documentation:
    https://docs.brew.sh
mxgx:Desktop mxgx$
mxgx:Desktop mxgx$
mxgx:Desktop mxgx$ curl -L https://get.rvm.io | bash -s stable
  % Total    % Received % Xferd  Average Speed   Time    Time     Time  Current
                                 Dload  Upload   Total   Spent    Left  Speed
100   194  100   194    0     0     23      0  0:00:08  0:00:08 --:--:--    59
100 24535  100 24535    0     0   2720      0  0:00:09  0:00:09 --:--:--  2720
Downloading https://github.com/rvm/rvm/archive/1.29.9.tar.gz
Downloading https://github.com/rvm/rvm/releases/download/1.29.9/1.29.9.tar.gz.asc
Found PGP signature at: 'https://github.com/rvm/rvm/releases/download/1.29.9/1.29.9.tar.gz.asc',
but no GPG software exists to validate it, skipping.
Upgrading the RVM installation in /Users/mxgx/.rvm/
    RVM PATH line found in /Users/mxgx/.mkshrc /Users/mxgx/.profile /Users/mxgx/.bashrc /Users/mxgx/.zshrc.
    RVM sourcing line found in /Users/mxgx/.profile /Users/mxgx/.zlogin.
    RVM sourcing line not found for Bash, rerun this command with '--auto-dotfiles' flag to fix it.
Upgrade of RVM in /Users/mxgx/.rvm/ is complete.

Thanks for installing RVM 🙏
Please consider donating to our open collective to help us maintain RVM.

👉  Donate: https://opencollective.com/rvm/donate


mxgx:Desktop mxgx$ rvm -v
-bash: rvm: command not found
mxgx:Desktop mxgx$ source ~/.rvm/scripts/rvm
mxgx:Desktop mxgx$ rvm -v
rvm 1.29.9 (latest) by Michal Papis, Piotr Kuczynski, Wayne E. Seguin [https://rvm.io]
- 3、参考链接
2020.05.08 更新
问题一:xcode-select: error: invalid developer directory ‘/Library/Developer/CommandLineTools’ Failed during: /usr/bin/sudo /usr/bin/xcode-select –switch /Library/Developer/CommandLineTools
- 1、报错信息
在安装 brew 的时候,执行如下命令时出现如下报错:
/bin/bash -c "$(curl -fsSL https://raw.githubusercontent.com/Homebrew/install/master/install.sh)"
Error installing updates.
==> /usr/bin/sudo /bin/rm -f /tmp/.com.apple.dt.CommandLineTools.installondemand.in-progress
==> /usr/bin/sudo /usr/bin/xcode-select --switch /Library/Developer/CommandLineTools
xcode-select: error: invalid developer directory '/Library/Developer/CommandLineTools'
Failed during: /usr/bin/sudo /usr/bin/xcode-select --switch /Library/Developer/CommandLineTools
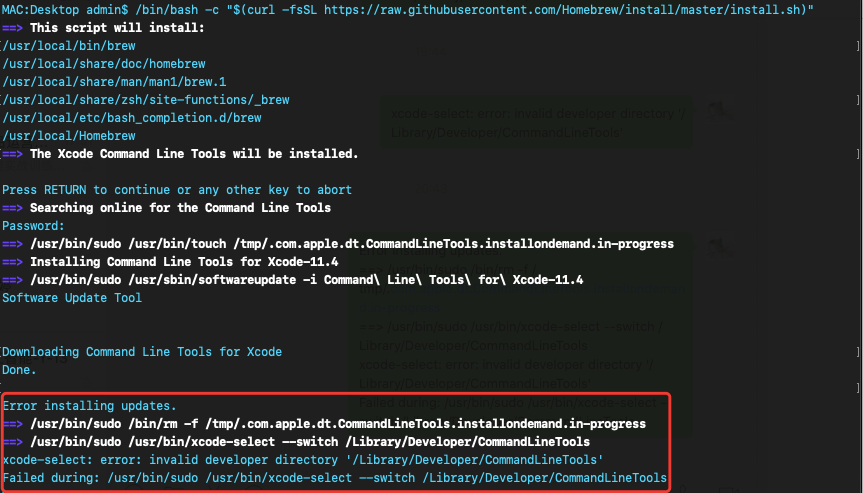
- 2、解决办法
查询了很多资料,发现主要就是因为路径产生一些错误问题,网上也给了很多解决办法,但是经过本人测试,发现比较实在点的方法:
1、直接去 Apple Developer - More Downloads 下载对应 Xcode 版本的
Command Line Tools for Xcode文件,估计在 200MB+;2、说明步骤一:【其实也可以通过执行如下指令进行安装,但是发现有时候会无法进行安装,大概原因是由于之前存在的旧版本,被识别到了之后就不会再进行安装了】
xcode-select --install3、执行指令如下指令,会得到相应的路径结果:
xcode-select -p
结果:/Applications/Xcode.app/Contents/Developer
4、然后在执行如下指令更改路径即可:
sudo xcode-select -switch /Applications/Xcode.app/Contents/Developer5、最后再次执行 brew 的安装命令即可:
/bin/bash -c "$(curl -fsSL https://raw.githubusercontent.com/Homebrew/install/master/install.sh)"
3、参考链接
2022.09.16 更新
问题一:ERROR: SSL verification error at depth 1: unable to get local issuer certificate (20) ERROR: You must add /O=Digital Signature Trust Co./CN=DST Root CA X3 to your local tr sted store
- 1、报错信息
ERROR:  SSL verification error at depth 1: unable to get local issuer certificate (20) ERROR:  You must add /O=Digital Signature Trust Co./CN=DST Root CA X3 to your local tr sted store
ERROR:  SSL verification error at depth 1: unable to get local issuer certificate (20) ERROR:  You must add /O=Digital Signature Trust Co./CN=DST Root CA X3 to your local tr sted store
ERROR:  SSL verification error at depth 1: unable to get local issuer certificate (20) ERROR:  You must add /O=Digital Signature Trust Co./CN=DST Root CA X3 to your local tr sted store
ERROR:  Could not find a valid gem 'bundler' (>= 0), here is why:
          Unable to download data from https://gems.ruby-china.com/ - SSL_connect retu ned=1 errno=0 state=error: certificate verify failed (unable to get local issuer certi icate) (https://gems.ruby-china.com/specs.4.8.gz)
ERROR:  SSL verification error at depth 1: unable to get local issuer certificate (20) ERROR:  You must add /O=Digital Signature Trust Co./CN=DST Root CA X3 to your local tr sted store
ERROR:  SSL verification error at depth 1: unable to get local issuer certificate (20) ERROR:  You must add /O=Digital Signature Trust Co./CN=DST Root CA X3 to your local tr sted store
- 2、问题解决
由于近两天刚升级系统到 MacOS 12.6,Xcode 14.0,今天运行 Xcode 的时候突然出现了 CocoaPods 相关的一些报错,故此原本打算通过更新 CocoaPods 尝试解决相关报错的,结果就突然出现了上面的报错信息。
根据网上的一些参考资料,都是提到了 Ruby 版本过低,需要进行更新之类的,然而实际上本人这边操作并不能解决实际问题。
该问题主要还是因为通过 brew 安装 ruby 环境的时候出问题了。
后经过多方尝试,最终解决了:
/// 执行了如下相关指令:

$ /bin/bash -c "$(curl -fsSL https://raw.githubusercontent.com/Homebrew/install/HEAD/install.sh)"
$ brew update
$ brew upgrade
$ sudo gem install -n /usr/local/bin cocoapods
/// 相关指令

/// 1、下载安装 Homebrew(已安装自行忽略),官网:https://brew.sh/index_zh-cn
$ /bin/bash -c "$(curl -fsSL https://raw.githubusercontent.com/Homebrew/install/HEAD/install.sh)"
/// 查看 brew 版本号
brew -v
/// 更新 Homebrew 自己
brew update
/// 查看安装列表
brew list

/// 2、更新所有包(执行时间较长,几分钟到一小时不等)
brew upgrade
/// 更新指定包
brew upgrade [包名]
/// 查询可更新的包
brew outdated

/// 3、清理所有包的旧版本
brew cleanup
/// 清理指定包的旧版本
brew cleanup [包名]
/// 查看可以清理的旧版本包,不执行清理操作
brew cleanup -n
3、参考资料
- 知乎 - Mac 下 Homebrew 的基本命令
- CSDN - CocoaPods 安装出现 SSL verification error
- CSDN - gem install bundler SSL 证书错误 解决办法
问题二:/System/Library/Frameworks/Ruby.framework/Versions/2.6/usr/lib/ruby/2.6.0/rubygems.rb:283:in `find_spec_for_exe’: can’t find gem cocoapods (>= 0.a) with executable pod (Gem::GemNotFoundException)
- 1、报错信息
✗✗✗✗✗✗ mxgx% pod --version
/System/Library/Frameworks/Ruby.framework/Versions/2.6/usr/lib/ruby/2.6.0/rubygems.rb:283:in `find_spec_for_exe': can't find gem cocoapods (>= 0.a) with executable pod (Gem::GemNotFoundException)
	from /System/Library/Frameworks/Ruby.framework/Versions/2.6/usr/lib/ruby/2.6.0/rubygems.rb:302:in `activate_bin_path'
	from /usr/local/bin/pod:23:in `<main>'
- 2、问题解决
该问题和问题一一样,都是属于因为 brew 安装 ruby 环境出错引起的问题。
/// 执行如下指令


$ /bin/bash -c "$(curl -fsSL https://raw.githubusercontent.com/Homebrew/install/HEAD/install.sh)"
$ brew reinstall cocoapods
$ brew link --overwrite cocoapods
当执行完 /bin/bash -c "$(curl -fsSL https://raw.githubusercontent.com/Homebrew/install/HEAD/install.sh)" 指令后,然后执行重装 cocoapods 命令。
当执行 brew reinstall cocoapods 的过程中,可能会遇到类似的报错:
✗✗✗✗✗✗ mxgx% brew reinstall cocoapods
==> Downloading https://ghcr.io/v2/homebrew/core/cocoapods/manifests/1.11.3
######################################################################## 100.0%
==> Downloading https://ghcr.io/v2/homebrew/core/cocoapods/blobs/sha256:92ea102a56b7f97ea877b289b92ac7005f10be6ad68917f451160f97345
==> Downloading from https://pkg-containers.githubusercontent.com/ghcr1/blobs/sha256:92ea102a56b7f97ea877b289b92ac7005f10be6ad68917
######################################################################## 100.0%
==> Reinstalling cocoapods
==> Pouring cocoapods--1.11.3.monterey.bottle.tar.gz
Error: The `brew link` step did not complete successfully
The formula built, but is not symlinked into /usr/local
Could not symlink bin/pod
Target /usr/local/bin/pod
already exists. You may want to remove it:
  rm '/usr/local/bin/pod'

To force the link and overwrite all conflicting files:
  brew link --overwrite cocoapods

To list all files that would be deleted:
  brew link --overwrite --dry-run cocoapods

Possible conflicting files are:
/usr/local/bin/pod
/usr/local/bin/xcodeproj
==> Summary
🍺  /usr/local/Cellar/cocoapods/1.11.3: 14,135 files, 29.9MB
==> Running `brew cleanup cocoapods`...
Disable this behaviour by setting HOMEBREW_NO_INSTALL_CLEANUP.
Hide these hints with HOMEBREW_NO_ENV_HINTS (see `man brew`).
解决冲突执行如下指令即可:
✗✗✗✗✗✗ mxgx% brew link --overwrite cocoapods
Linking /usr/local/Cellar/cocoapods/1.11.3... 2 symlinks created.
不过紧接着可能就会出现问题三的报错。
3、参考资料
pod install 報錯: can’t find gem cocoapods (>= 0.a) with executable pod (Gem::GemNotFoundException)
问题三:/System/Library/Frameworks/Ruby.framework/Versions/2.6/usr/lib/ruby/2.6.0/rubygems/dependency.rb:311:in `to_specs’: Could not find ‘CFPropertyList’ (>= 2.3.3, < 4.0) among 158 total gem(s) (Gem::MissingSpecError)
- 1、报错信息
✗✗✗✗✗✗ mxgx% pod --version
/System/Library/Frameworks/Ruby.framework/Versions/2.6/usr/lib/ruby/2.6.0/rubygems/dependency.rb:311:in `to_specs': Could not find 'CFPropertyList' (>= 2.3.3, < 4.0) among 158 total gem(s) (Gem::MissingSpecError)
Checked in 'GEM_PATH=/Users/mxgx/.rvm/gems/ruby-2.7.0:/Users/mxgx/.rvm/rubies/ruby-2.7.0/lib/ruby/gems/2.7.0:/usr/local/Cellar/cocoapods/1.11.3/libexec', execute `gem env` for more information
	from /System/Library/Frameworks/Ruby.framework/Versions/2.6/usr/lib/ruby/2.6.0/rubygems/specification.rb:1449:in `block in activate_dependencies'
	from /System/Library/Frameworks/Ruby.framework/Versions/2.6/usr/lib/ruby/2.6.0/rubygems/specification.rb:1438:in `each'
	from /System/Library/Frameworks/Ruby.framework/Versions/2.6/usr/lib/ruby/2.6.0/rubygems/specification.rb:1438:in `activate_dependencies'
	from /System/Library/Frameworks/Ruby.framework/Versions/2.6/usr/lib/ruby/2.6.0/rubygems/specification.rb:1420:in `activate'
	from /System/Library/Frameworks/Ruby.framework/Versions/2.6/usr/lib/ruby/2.6.0/rubygems/specification.rb:1452:in `block in activate_dependencies'
	from /System/Library/Frameworks/Ruby.framework/Versions/2.6/usr/lib/ruby/2.6.0/rubygems/specification.rb:1438:in `each'
	from /System/Library/Frameworks/Ruby.framework/Versions/2.6/usr/lib/ruby/2.6.0/rubygems/specification.rb:1438:in `activate_dependencies'
	from /System/Library/Frameworks/Ruby.framework/Versions/2.6/usr/lib/ruby/2.6.0/rubygems/specification.rb:1420:in `activate'
	from /System/Library/Frameworks/Ruby.framework/Versions/2.6/usr/lib/ruby/2.6.0/rubygems.rb:304:in `block in activate_bin_path'
	from /System/Library/Frameworks/Ruby.framework/Versions/2.6/usr/lib/ruby/2.6.0/rubygems.rb:303:in `synchronize'
	from /System/Library/Frameworks/Ruby.framework/Versions/2.6/usr/lib/ruby/2.6.0/rubygems.rb:303:in `activate_bin_path'
	from /usr/local/Cellar/cocoapods/1.11.3/libexec/bin/pod:23:in `<main>'
- 2、问题解决
该问题和前两个问题类似,都是因为 brew 安装 ruby 环境引起的。
/// 执行如下指令
/// 第一条指令前面执行过了,此处可以忽略

$ /bin/bash -c "$(curl -fsSL https://raw.githubusercontent.com/Homebrew/install/HEAD/install.sh)"
$ gem install xcodeproj
虽然有说执行 sudo gem install CFPropertyList 指令即可以解决问题,但是个人并未解决问题。
执行信息如下:
/// 此处对网络要求比较高,尽量开全局代理

✗✗✗✗✗✗ mxgx% /bin/bash -c "$(curl -fsSL https://raw.githubusercontent.com/Homebrew/install/HEAD/install.sh)"
==> Checking for `sudo` access (which may request your password)...
==> This script will install:
/usr/local/bin/brew
/usr/local/share/doc/homebrew
/usr/local/share/man/man1/brew.1
/usr/local/share/zsh/site-functions/_brew
/usr/local/etc/bash_completion.d/brew
/usr/local/Homebrew

Press RETURN/ENTER to continue or any other key to abort:
==> /usr/bin/sudo /usr/sbin/chown -R mxgx:admin /usr/local/Homebrew
==> Downloading and installing Homebrew...
HEAD is now at 7a14ae618 Merge pull request #13876 from Homebrew/sponsors-maintainers-man-completions
==> Installation successful!

==> Homebrew has enabled anonymous aggregate formulae and cask analytics.
Read the analytics documentation (and how to opt-out) here:
  https://docs.brew.sh/Analytics
No analytics data has been sent yet (nor will any be during this install run).

==> Homebrew is run entirely by unpaid volunteers. Please consider donating:
  https://github.com/Homebrew/brew#donations

==> Next steps:
- Run brew help to get started
- Further documentation:
    https://docs.brew.sh
✗✗✗✗✗✗ mxgx% gem install xcodeproj
Fetching xcodeproj-1.22.0.gem
Fetching atomos-0.1.3.gem
Fetching rexml-3.2.5.gem
Fetching claide-1.1.0.gem
Fetching nanaimo-0.3.0.gem
Fetching CFPropertyList-3.0.5.gem
Fetching colored2-3.1.2.gem
Successfully installed atomos-0.1.3
Successfully installed rexml-3.2.5
Successfully installed CFPropertyList-3.0.5
Successfully installed claide-1.1.0
Successfully installed colored2-3.1.2
Successfully installed nanaimo-0.3.0
Successfully installed xcodeproj-1.22.0
Parsing documentation for atomos-0.1.3
Installing ri documentation for atomos-0.1.3
Parsing documentation for rexml-3.2.5
Installing ri documentation for rexml-3.2.5
Parsing documentation for CFPropertyList-3.0.5
Installing ri documentation for CFPropertyList-3.0.5
Parsing documentation for claide-1.1.0
Installing ri documentation for claide-1.1.0
Parsing documentation for colored2-3.1.2
Installing ri documentation for colored2-3.1.2
Parsing documentation for nanaimo-0.3.0
Installing ri documentation for nanaimo-0.3.0
Parsing documentation for xcodeproj-1.22.0
Installing ri documentation for xcodeproj-1.22.0
Done installing documentation for atomos, rexml, CFPropertyList, claide, colored2, nanaimo, xcodeproj after 2 seconds
7 gems installed
{22-09-16 16:05}[ruby-2.7.0]mxgx:~/Documents/GitHub/MyAppStore/JJCComicBook/Code/JJCComicBook@dev✗✗✗✗✗✗ mxgx% pod --version
1.11.3
2024.04.06 更新:
- 1、查看是否存在多个 ruby 版本,通过
rvm list进行查看,建议使用多个版本中的最高版本;- 2、可以通过
rvm use ruby-3.2.0 --default类似的方法设置ruby版本;- 3、然后再次检测是否仍有报错。
3、参考资料
- CSDN - pod lib create 报错的问题
- CSDN - React-Native ios pod install 问题
- 简书 - CocoaPods 踩坑:activate_dependencies’: Could not find ‘CFPropertyList’ (>= 2.3.3, < 4.0) among 78 to…
2023.05.04 更新
pod search 搜索很慢或搜索为空问题
解决办法:
- ① 执行
rm ~/Library/Caches/CocoaPods/ search_index.json指令,清除pod search缓存; - ② 执行
pod setup将CocoaPods信息下载到~/.cocoapods/repos/文件目录下; - ③ 在
~/.cocoapods/repos/目录文件夹下,通过pod repo list指令查询当前源list; - ④ 如果只有
trunk源,通过git clone https://git.coding.net/CocoaPods/Specs.git在该文件夹下克隆; - ⑤ 通过
pod repo remove 'trunk'指令移除trunk源即可。
- ① 执行
参考链接:
2024.04.06 更新
SDK does not contain ‘libarclite’ at the path
报错信息:
SDK does not contain 'libarclite' at the path '/Applications/Xcode.app/Contents/Developer/Toolchains/XcodeDefault.xctoolchain/usr/lib/arc/libarclite_iphoneos.a'; try increasing the minimum deployment target报错原因:
Xcode 15在某些CocoaPods中存在构建问题,因为其XcodeDefaults工具链内容中缺少.a文件。解决办法:
- 1、将缺失文件拷贝放入
/Xcode.app/Contents/Developer/Toolchains/XcodeDefault.xctoolchain/usr/lib/arc/文件夹下;- 2、如果没有该文件就手动创建该文件即可;
- 3、缺少哪种文件就将哪种文件放入该文件夹即可,建议将
libarclite_iphonesimulator.a和libarclite_iphoneos.a两个文件优先放入其中,毕竟是最常用的。下载链接:
声明:
报错信息板块尚未写完,后面有时间会继续完善!!! 如果有错误的信息,希望大家可以指出,进而及时修改,相互学习!!! 如有转载的,希望可以注明出处!!!
版权声明
原文作者:苜蓿鬼仙(苜蓿、jijiucheng)
原文链接:GitHub.io - 苜蓿鬼仙 - 【iOS】rvm、Ruby 环境和 CocoaPods 安装使用及相关报错问题解决(2020.09.16 更新)
发表日期:2020/04/17 17:00:00
更新日期:2023/05/04 12:00:00
GitHub:GitHub - jijiucheng
个人博客:GitHub.io - 苜蓿鬼仙
小专栏:小专栏 - 苜蓿鬼仙
掘金:掘金 - 苜蓿鬼仙
微博:微博 - 苜蓿鬼仙
公众号:微信 - 苜蓿小站
小程序:微信 - 苜蓿小站
文档信息
- 本文作者:苜蓿鬼仙
- 本文链接:https://jijiucheng.github.io/2020/04/17/CocoaPods/
- 版权声明:自由转载-非商用-非衍生-保持署名(创意共享3.0许可证)